Writing Own PowerShell ISE Add-On Functions is not very difficult and can increase your efficiency tremendously. I would like to share my experience with some examples so you can be efficient as well and use spare time for other more demanding tasks.
In this article, I would like to show you:
- Step by step guidelines for writing own PowerShell ISE Add-On Functions with one detailed example that further explains the steps and shows you how can you use it yourself.
- I will give to you a short overview of PowerShell ISE Object Model that is very useful for writing this code.
- Next, I will explain to you how PowerShell function becomes PowerShell ISE Add-On Menu Item and what happens when you start PowerShell ISE Environment.
- Finally, I will list some other PowerShell ISE Add-On Functions that we have already created and you can read about them in separate articles in more detail.
Table of Contents
PowerShell ISE Add-On Function – Steps To Follow
Here are the general steps to follow when writing own PowerShell ISE Add-ons Functions:
- Write the code for the PowerShell ISE Add-On function as Advanced PowerShell Function.
- Use the Boolean Input Parameter to Install PowerShell ISE Add-On Function as Menu Item in PowerShell ISE Environment.
- In the BEGIN block of PowerShell ISE Add-On Function implement the code to install the function as Menu Item of PowerShell ISE Environment.
- Write Your Code that will do the tasks that you want to perform with PowerShell ISE Add-On Function.
- Call the PowerShell ISE Add-On Function with the input parameter to install the menu.
- Optionally organize your PowerShell ISE Add-On Functions in PowerShell Module.
- Add Your PowerShell Module or Function into PowerShell Profile.
Let me explain each of the steps mentioned above with one example so things are more clear.
PowerShell ISE Object Model
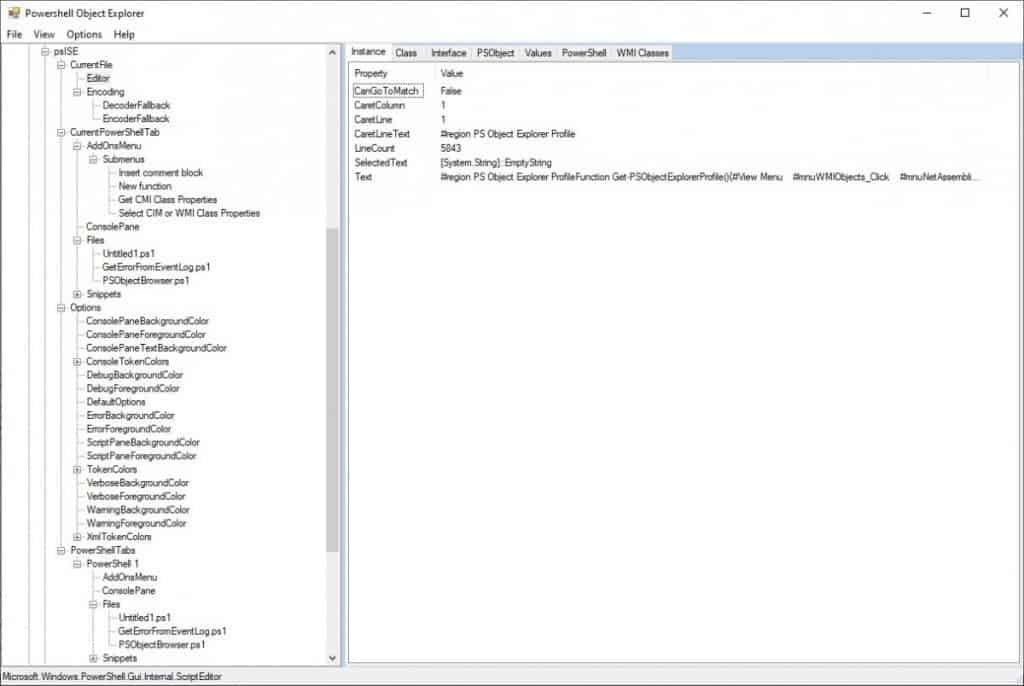
But before we jump into the example I would like to mention PowerShell ISE Object Model which is very important when writing the code for PowerShell Add-On Functions.
Especially pay attention to the CurrentFile and CurrentPowerShellTab branches of PowerShell ISE Object Model since we will use them in the following example.
We will use Current File -> Editor objects when we want to get selected text or insert the text into the current PowerShell script pane like in the following code snippets.
$psISE.CurrentFile.Editor.SelectedText$TemplateFunction = @("Some Text")
$psISE.CurrentFile.Editor.InsertText($TemplateFunction)We will use Current PowerShell Tab -> Add-Ons Menu -> Sub Menu when we want to add the function as PowerShell ISE Add-Ons Menu Item like in the code example below.
$psISE.CurrentPowerShellTab.AddOnsMenu.SubMenus.Add("New function",{New-Function},"Ctrl+Alt+S") | Out-NullHere is the screenshot of the PowerShell ISE Object Model.
TIP: If you want to use the same PowerShell Browser as I just did please download the script from here.
Example PowerShell ISE Add-On Function
We will look into the code of New-Function CmdLet but first, let me credit the person who wrote that function.
I would really like to thank Jeff Patton for writing a collection of functions in PSISELibrary.ps1 that you can download here.
I have changed it a little bit to tune to my needs but let’s move on to the function code and explanation.
If you want to follow me along while I describe the function please download the zip file with the source code from here.
New-Function CmdLet source code is located in …/Modules/09addons/ folder and is part of CmdLet libraries that I have written and named Efficiency Booster PowerShell Project with the intention to help us IT people in our day to day IT tasks.
If we run this code either by pressing F8 (Run Selection) or Ctrl + Alt + S (shortcut for running New-Function Add-on CmdLet)
New-Function -FunctionName "New-ImprovedFunction"What Did We Get?
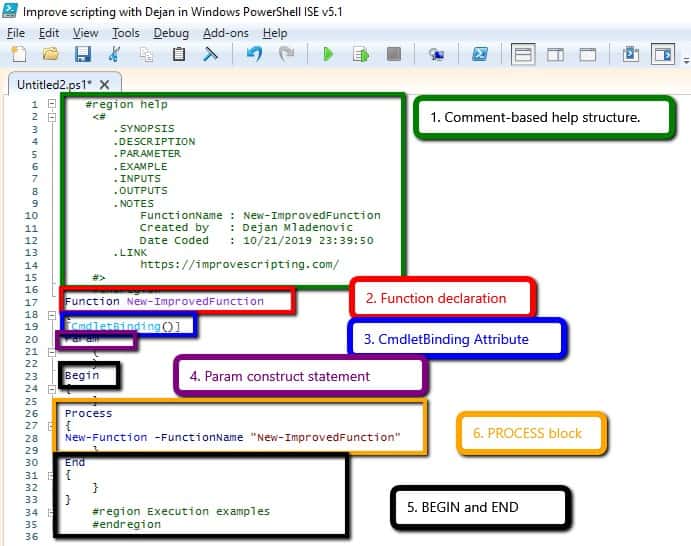
Let’s just quickly review the sections of code that was generated by New-Function Add-on CmdLet:
- We got a comment-based help structure.
- We got a function declaration with the function name that we have provided as the value for parameter FunctionName.
- We got the CmdletBinding attribute.
- We got the “Param” construct statement so we can continue writing function input parameters within it.
- We got empty BEGIN and END blocks.
- We got selected code in the PROCESS block. In this case, we can delete that part and start writing our own code for “New-ImprovedFunction” function
Here is a visual representation of what we have just numbered in the list.
Let’s come back to the steps that we laid out at the beginning of this blog.
Step 1 – Write the code for the PowerShell ISE Add-On function as Advanced PowerShell Function
To write the function as Advanced PowerShell Function basically means that this function needs to have certain blocks of code which we will see in more details in the example but just to name these blocks of code:
- Function Name
- Function Input Parameters
- Implementation of CmdletBinding Attribute
- Begin, Process and End Blocks
- Optionally Comment-based help region
- Call to Function as needed (In separate Execution region, optionally)
As you can see in the code snippet below we are, as an example, writing Advanced PowerShell Function with the name New-Function. We have implemented the CmdletBinding Attribute. Next, we have Function input parameters section Param() and we will define input parameters in the following steps. Finally, we define Input Methods for Pipeline: Begin, Process and End. At the moment these blocks are empty but we will write additional code in a minute.
For the sake of simplicity, I have not written any comment-based help code but I have written the links to several interesting articles that cover all the sections mentioned above including writing the function’s help.
Here is the starting code for Advanced PowerShell Function (New-Function):
Function New-Function
{
    [CmdletBinding()]
    Param
    (
    )
    Begin
    {
    }
    Process
    {
    }
    End
    {
    }
}INFO: My best advice to every PowerShell scripter is to learn writing own PowerShell Advanced Functions and CmdLets and I have written several articles explaining this, so please read them. How To Create A Custom PowerShell CmdLet (Step By Step). Here I explain how to use PowerShell Add-on Function to be faster in writing PowerShell Functions How To Write Advanced Functions Or CmdLets With PowerShell (Fast).
INFO: To know more about PowerShell Parameters and Parameter Sets with some awesome examples please read the following articles How To Create Parameters In PowerShell and How To Use Parameter Sets In PowerShell Functions.
INFO: To understand BEGIN, PROCESS and END blocks in PowerShell please read PowerShell Function Begin Process End Blocks Explained With Examples.
INFO: PowerShell Pipelining is a very important concept and I highly recommend you to read the article written on the subject. How PowerShell Pipeline Works. Here I have shown in many examples the real power of PowerShell using the Pipelining.
INFO: If you want to learn how to write comment-based Help for your own PowerShell Functions and Scripts please read these articles How To Write PowerShell Help (Step by Step). In this article How To Write PowerShell Function’s Or CmdLet’s Help (Fast), I explain the PowerShell Add-on that help us to be fast with writing help content.
Step 2 – Use the Boolean Input Parameter to Install PowerShell ISE Add-On Function as Menu Item in PowerShell ISE Environment.
For now, we will just define the $InstallMenu input parameter. Later (Step 4) we will define additional input parameters and I will show you how to implement the $InstallMenu input parameter to actually add the function as PowerShell ISE Add-On Menu Item.
Function New-Function
{
    [CmdletBinding()]
    Param
        (
        $InstallMenu
        )
}
Step 3 – In the BEGIN block of PowerShell ISE Add-On Function implement the code to install the function as Menu Item of PowerShell ISE Environment.
Now it is the time to implement the $InstallMenu input parameter that we have defined and to actually add this example function as PowerShell ISE Add-On Menu Item.
If you wonder why we are doing the implementation in the BEGIN block the simple answer is that this block of code is run only once and at the beginning of function execution and this is exactly what we need.
It is important to notice that we use the Add method of Sub Menu object to add our example function (Remember the PowerShell ISE Object Model that I was mentioning earlier).
- The first parameter to Add method is the text that will show as Menu Item (“New Function”),
- The second parameter is the name of the function that we are running (New-Function)
- And the last parameter is the keyboard shortcut to use for running the function ( CTRL + ALT + S).
Another thing to notice is the PowerShell ISE Object Model up to the Add method: Current PowerShell Tab -> Add-Ons Menu -> Sub Menu.
We are also implementing Error handling just in case if any error occurs.
Here is the implementation code in Begin block.
Begin
{

    if ($InstallMenu)
    {
        Write-Verbose "Try to install the menu item, and error out if there's an issue."
        try
        {
            $psISE.CurrentPowerShellTab.AddOnsMenu.SubMenus.Add("New function",{New-Function},"Ctrl+Alt+S") | Out-Null
        }
        catch
        {
            Return $Error[0].Exception
        }
    }

}
In Step 5, I will show you how to call this function in order to add it as Menu Item.
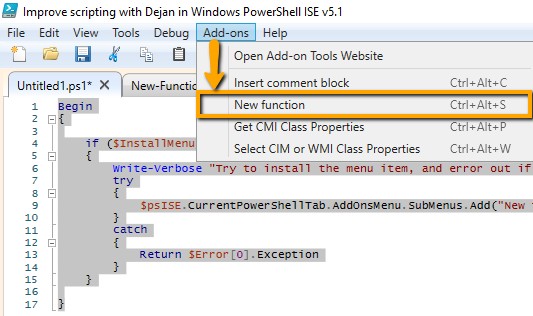
As a final result, we will have New-Function as Menu Item in PowerShell ISE Environment as you can see on the screenshot.
INFO: To learn about PowerShell Error Handling and code debugging please read the following articles: How To Log PowerShell Errors And Much More and How To Debug PowerShell Scripts.
Step 4 – Write Your Code that will do the tasks that you want to perform with PowerShell ISE Add-On Function.
In this step, we write the code needed for the function to perform tasks that we want to accomplish and for this example, we will write additional input parameters, write some code in begin and process blocks.
Input Parameters
In step 2 we have already defined the $InstallMenu input parameter now we will focus on Param() construct of our Advance Function again and define two more input parameters.
For this example function, we have defined two additional input parameters:
- $SelectedText (This parameter will copy the code that we have written in the current tab of PowerShell ISE Script Pane and it will write that copied code into the PROCESS block of the function that we create )
- $FunctionName (is a string parameter which is the name of the function that we want to create, in our example we create a function with name “New-ImprovedFunction”)
BEGIN Block
In the begin block, we have defined $TemplateFunction variable that holds the function template as text
PROCESS Block
In the process block, we have the actual code that produces the result of New-Function Function. Here we use again the $InstallMenu input parameter but this time we want to run the code only when not installing New-Function as PowerShell ISE Add-On Menu Item which we already did in the begin block of the code in step 3.
Please notice that we use the InsertText method mentioned in PowerShell ISE Object Model and this will write our function template text into the current tab of PowerShell ISE Environment and produce the result for New-Function Function.
We are almost done with writing the code for our New-Function Function.
Function New-Function
{
    [CmdletBinding()]
    Param
        (
        $SelectedText = $psISE.CurrentFile.Editor.SelectedText,
        $InstallMenu,
        $FunctionName
        )
    Begin
    {

        $TemplateFunction = @(
        "    #region help`r`n"
        "    <#`r`n"
        "       .SYNOPSIS`r`n"
        "       .DESCRIPTION`r`n"
        "       .PARAMETER`r`n"
        "       .EXAMPLE`r`n"
        "       .INPUTS`r`n"
        "       .OUTPUTS`r`n"
        "       .NOTES`r`n"
        "           FunctionName : $FunctionName`r`n"
        "           Created by   : $($env:username)`r`n"
        "           Date Coded   : $(Get-Date)`r`n"
        "       .LINK`r`n"
        "           http://improvescripting.com/`r`n"
        "    #>`r`n"
        "    #endregion`r`n"
        "Function $FunctionName`r`n"
        "{`r`n"
        "[CmdletBinding()]`r`n"
        "Param`r`n"
        "    (`r`n"
        "    )`r`n"
        "Begin`r`n"
        "{`r`n"
        "    }`r`n"
        "Process`r`n"
        "{`r`n"
        "$($SelectedText)`r`n"
        "    }`r`n"
        "End`r`n"
        "{`r`n"
        "    }`r`n"
        "}`r`n"
        "    #region Execution examples`r`n"
        "    #endregion`r`n")
        if ($InstallMenu)
        {
            Write-Verbose "Try to install the menu item, and error out if there's an issue."
            try
            {
                $psISE.CurrentPowerShellTab.AddOnsMenu.SubMenus.Add("New function",{New-Function},"Ctrl+Alt+S") | Out-Null
                }
            catch
            {
                Return $Error[0].Exception
                }
            }

        }
    Process
    {
        if (!$InstallMenu)
        {
            Write-Verbose "Don't create a function if we're installing the menu"
            try
            {
                Write-Verbose "Create a new empty function, return an error if there's an issue."
                $psISE.CurrentFile.Editor.InsertText($TemplateFunction)
                }
            catch
            {
                Return $Error[0].Exception
                }
            }
        }
    End
    {
        }
}INFO: If you want to know more about the reasons for writing New-Function Add-On Function please read this article where I have explained everything in more detail. How To Write Advanced Functions Or CmdLets With PowerShell (Fast).
Step 5 – Call the PowerShell ISE Add-On Function with the input parameter to install the menu.
Finally, we will call the function with the InstallMenu input parameter set to true.
If we look at the code snippet below and into Execution examples region in the code snippet of the whole function that follows we will see the following call to New-Function:
New-Function -InstallMenu $trueThis call combined with the saving of this function as PowerShell script, organizing into PowerShell Module, and loading with PowerShell Profile will give us as result the Menu Item in PowerShell ISE Add-On Menu. (I will explain these steps in the short).
Function New-Function
{
    [CmdletBinding()]
    Param
        (
        $SelectedText = $psISE.CurrentFile.Editor.SelectedText,
        $InstallMenu,
        $FunctionName
        )
    Begin
    {

        $TemplateFunction = @(
        "    #region help`r`n"
        "    <#`r`n"
        "       .SYNOPSIS`r`n"
        "       .DESCRIPTION`r`n"
        "       .PARAMETER`r`n"
        "       .EXAMPLE`r`n"
        "       .INPUTS`r`n"
        "       .OUTPUTS`r`n"
        "       .NOTES`r`n"
        "           FunctionName : $FunctionName`r`n"
        "           Created by   : $($env:username)`r`n"
        "           Date Coded   : $(Get-Date)`r`n"
        "       .LINK`r`n"
        "           http://improvescripting.com/`r`n"
        "    #>`r`n"
        "    #endregion`r`n"
        "Function $FunctionName`r`n"
        "{`r`n"
        "[CmdletBinding()]`r`n"
        "Param`r`n"
        "    (`r`n"
        "    )`r`n"
        "Begin`r`n"
        "{`r`n"
        "    }`r`n"
        "Process`r`n"
        "{`r`n"
        "$($SelectedText)`r`n"
        "    }`r`n"
        "End`r`n"
        "{`r`n"
        "    }`r`n"
        "}`r`n"
        "    #region Execution examples`r`n"
        "    #endregion`r`n")
        if ($InstallMenu)
        {
            Write-Verbose "Try to install the menu item, and error out if there's an issue."
            try
            {
                $psISE.CurrentPowerShellTab.AddOnsMenu.SubMenus.Add("New function",{New-Function},"Ctrl+Alt+S") | Out-Null
                }
            catch
            {
                Return $Error[0].Exception
                }
            }

        }
    Process
    {
        if (!$InstallMenu)
        {
            Write-Verbose "Don't create a function if we're installing the menu"
            try
            {
                Write-Verbose "Create a new empty function, return an error if there's an issue."
                $psISE.CurrentFile.Editor.InsertText($TemplateFunction)
                }
            catch
            {
                Return $Error[0].Exception
                }
            }
        }
    End
    {
        }
    }
#region Execution examples
New-Function -InstallMenu $true
#endregion
Step 6 – Optionally organize your PowerShell ISE Add-On Functions in PowerShell Module
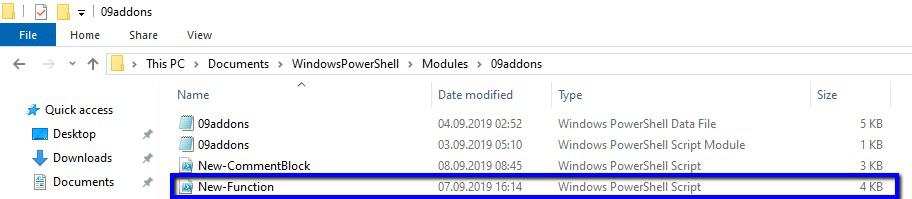
Here are the steps that I have followed in order to have New-Function loaded with PowerShell Profile: (You have all this already done if you have downloaded the zip file with the source code.)
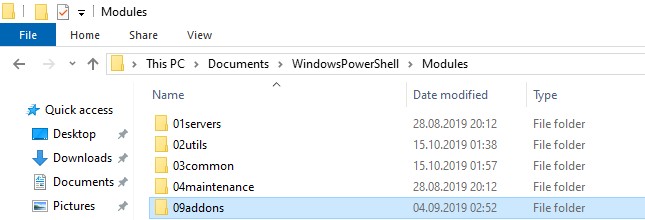
- have created 09addons folder where my Modules are and for me, that was this location C:\Users\$env:USERNAME\[My] Documents\WindowsPowerShell\Modules
- have saved New-Function as PowerShell script (.ps1 file) in 09addons folder that we have just created.
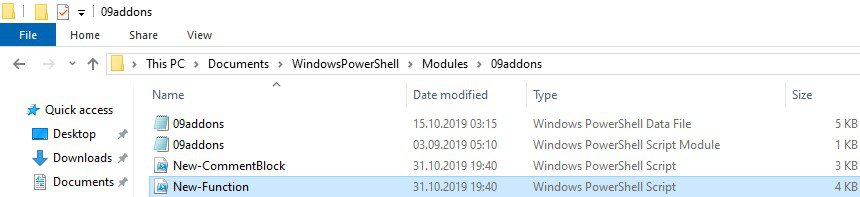
- have created and saved the PowerShell Script Module file (.psm1) in 09addons with the same name as the folder (09addons.psm1)
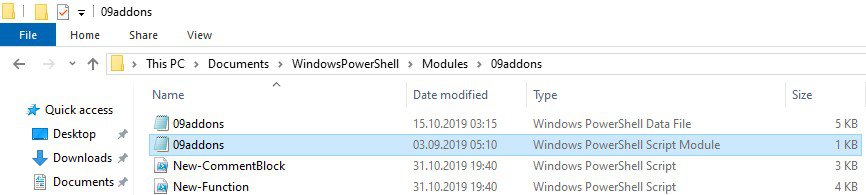
- have customized 09addons.psm1 module file with this line of code in order to load New-Function CmdLet into 09addons module:
. $psScriptRoot\New-Function.ps1 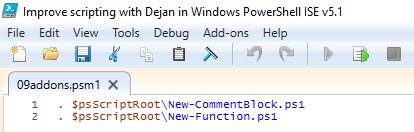
INFO: If you have wondered how to organize your PowerShell scripts into modules please read the following article. How To Create A Powershell Module (Different Approach).
Step 7 – Add Your PowerShell Module or Function into PowerShell Profile
The last step is to import our module into a PowerShell Profile file.
- have customized Profile file (Microsoft.PowerShellISE_profile.ps1) location for me: (C:\Users\$env:USERNAME\[My] Documents\WindowsPowerShell) with this line of code in order to Import 09addons Module:
Import-Module 09addons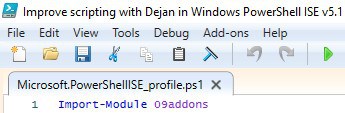
The reason to use this PowerShell Profile and not any other is very simple we want to import the 09addons module only in PowerShell ISE environment and not PowerShell Console.
INFO: If you want to know how to create and customize PowerShell Profiles, which profile file to use, and much more with awesome examples please read the following post How To Create PowerShell Profile Step by Step with Examples
What Happens When You Start PowerShell ISE?
If you wonder why was necessary to do all the steps from the previous section here is an explanation of PowerShell Workflow when every session starts. Hopefully, this will help you better understand previous steps.
When we open Windows PowerShell ISE here are things that happen in the background even before we see the ISE window:
- The new PowerShell session starts for the current user.
- PowerShell profile files have been loaded into the session (one of them is Microsoft.PowerShellISE_profile.ps1 that we have just customized).
- The profile file will import modules. In our example, it will load the 09addons module among the others.
- When the modules are imported the code inside the Script module file (.psm1) is executed. In our example, New-Function.ps1 script file will be executed
- When the script file is executed New-Function CmdLet function is loaded into the session. In our example this code will be executed:
New-Function -InstallMenu $true
… and that will add New-Function as Add-On Menu Item in Windows PowerShell ISE so we can use it as we need it. - Finally, our environment is customized and we see Windows PowerShell ISE application with Add-on New-Function added into our environment and we can start working on the coding.
I hope this explains the previous steps.
How To Use New-Function CmdLet
We have several ways to exploit this fabulous CmdLet.
IMPORTANT: We always open a new tab in order to get blank Script Pane in Windows PowerShell ISE so automatically generated template code is created there.
- We can press Ctrl + Alt + S and this will create an Advanced Function template for us without function name that we need to fill out and start writing our code.
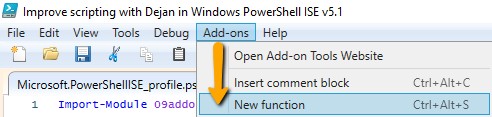
- We can go to menu Add-ons and choose New-Function menu item in Windows PowerShell ISE and this will do the same thing as in the previous example (look the screenshot below)
- We can write the call to New-Function CmdLet with parameter FunctionName string value provided for the name of function like in the example at the start of this post.
New-Function -FunctionName "New-ImprovedFunction" Press F8 or Ctrl + Alt + S and this will create our function with that name and template so we can start writing our code.
INFO: If you want to know more about New-Function CmdLet please read this article dedicated to it. How To Write Advanced Functions Or CmdLets With PowerShell (Fast).
PowerShell ISE Add-On Functions – My Examples
I have written several PowerShell ISE Add-On Functions and here are the links to the articles that explain each of them.
Or you can just click on Blog -> Add-Ons Menu item on this blog and you will get all the articles about PowerShell ISE Add-on Functions listed below.
Finally, you can click on this link for Add-On Function’s Articles.
| # | Function | Article |
|---|---|---|
| 1 | New-Function | How To Write Advanced Functions Or CmdLets With PowerShell (Fast) |
| 2 | New-CommentBlock | How To Write PowerShell Function’s Or CmdLet’s Help (Fast) |
| 3 | Get-CIMClassProperty | How To List CIM Or WMI Class All Properties And Their Datatypes With PowerShell |
| 4 | Select-CIMClassAllProperties | How To Write Select Statement For All Properties Of CIM Or WMI Class With PowerShell |