A PowerShell profile is a script that runs when PowerShell starts and has a specific name.
PowerShell supports several profiles for users and host programs. When we say host programs we primarily think on Windows PowerShell Console and Windows PowerShell ISE. However, it does not create the profiles for you so continue reading this article and I will show you how to create and customize profiles with awesome examples.
We can create 3 profile files for each user on the system, one for each host (Windows PowerShell Console and ISE) and one for all hosts.
In addition, it is possible to create 3 profile files for all users if we want to apply some customization applicable to all users.
IMPORTANT: If you have a separate installation of PowerShell version 6 then we can create 4 additional profiles. Two profile files per user and two profile files for all users.
Table of Contents
PowerShell Profile Commands, Hosts, Profile Names, Profile Locations
Here is a table that shows Profile Types, Command that can be used to test whether a profile exists and create them if we want to, Which Host this Profile applies to, Name of the Profile file, and Location of Profile File.
| # | Profile Type | Command | Host | Profile file name | Profile file location |
|---|---|---|---|---|---|
| 1* | Current User, Current Host | $profile | Console | Microsoft.PowerShell_profile.ps1 | $HOME\[My] Documents\WindowsPowerShell\ |
| 2 | All Users, Current Host | $profile.AllUsersCurrentHost | Console | Microsoft.PowerShell_profile.ps1 | $PSHOME\ |
| 3 | Current User, All Hosts | $profile.CurrentUserAllHosts | Console, ISE | Profile.ps1 | $HOME\[My] Documents\WindowsPowerShell\ |
| 4 | All Users, All Hosts | $profile.AllUsersAllHosts | Console, ISE | Profile.ps1 | $PSHOME\ |
| 5** | Current user, Current Host | $profile | ISE | Microsoft.PowerShellISE_profile.ps1 | $HOME\[My] Documents\WindowsPowerShell\ |
| 6** | All users, Current Host | $profile.AllUsersCurrentHost | ISE | Microsoft.PowerShellISE_profile.ps1 | $PSHOME\ |
* Instead of $profile we can use $profile.CurrentUserCurrentHost command.
** Run the command from Windows PowerShell ISE console.
In order for you to find the correct values for variables $HOME and $PSHOME on your installation of PowerShell please run following commands:
$HOMEUsually, value for $HOME is C:\Users\user_name

$PSHOMEUsually, value for $PSHOME is C:\Windows\System32\WindowsPowerShell\v1.0

REMEMBER: If you have a separate installation of PowerShell version 6 then we can create additional profiles. Two per current user and two for all users.
| # | Profile Type | Command | Host | Profile File Name | Profile File Location |
|---|---|---|---|---|---|
| 1 | CurrentUserCurrentHost | $profile | Console | Microsoft.PowerShell_profile.ps1 | $HOME\[My] Documents\PowerShell\ |
| 2 | CurrentUserAllHosts | $profile.CurrentUserAllHosts | profile.ps1 | $HOME\[My] Documents\PowerShell\ | |
| 3 | AllUsersCurrentHost | $profile.AllUsersCurrentHost | Console | Microsoft.PowerShell_profile.ps1 | $PSHOME\ |
| 4 | AllUsersAllHosts | $profile.AllUsersAllHosts | profile.ps1 | $PSHOME\ |
Usually, value for $HOME is C:\Users\user_name

Usually, value for $PSHOME is C:\Program Files\PowerShell\6

NOTICE: Difference between folder names in [My] Documents PowerShell v6 folder is PowerShell and prior PowerShell versions folder name is WindowsPowerShell.
How To Create PowerShell Profile Step by Step
Here I will show you exactly how to create a PowerShell profile.
Creating A PowerShell Profile For Current User And Current Host
This is the default Windows PowerShell profile.
Follow these steps to create a PowerShell profile for the Console as Host and current user:
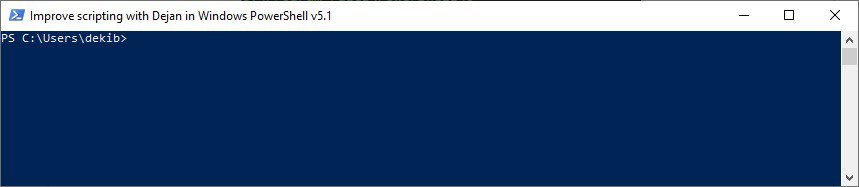
Step 1: Open the Windows PowerShell Console (Current Host).
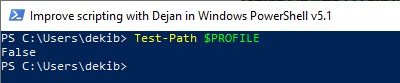
Step 2: First, we will test if Profile exists or not in our PowerShell installation. Type the following command at the Window PowerShell Console, and press ENTER.
Test-Path $PROFILEREMEMBER: Parameter value for Test-Path CmdLet we get from Table 2 – Command column. ($profile, $profile.CurrentUserAllHosts, etc)
Step 3: If the result of the previous command is false, the profile doesn’t exist so go to step 4. If the result is true, the profile file exists so go to step 5
Step 4: Since Profile doesn’t exist we will create one with the following command that you will type and press ENTER.
New-Item -Type File -Force $PROFILE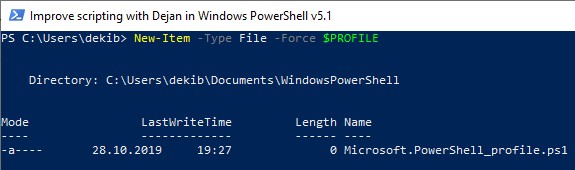

Step 5: The profile has been created and we can open Profile file in PowerShell ISE with the following command, and press ENTER.
ise $PROFILE
Step 6: Empty Profile file has been opened in Windows PowerShell ISE

Step 7: Continue to Example 1 to see how to customize this profile.
Creating a PowerShell profile for Current User and All Hosts
Follow these steps to create a PowerShell profile:
Step 1: Open the Windows PowerShell Console (This is just a host of choice to run the commands and we can do these steps from Windows PowerShell ISE as well).
Step 2: First, we will test if Profile exists or not in our PowerShell installation. Type the following command at the Window PowerShell Console, and press ENTER.
Test-Path $PROFILE.CurrentUserAllHostsREMEMBER: Parameter value for Test-Path CmdLet we get from Table 2 – Command column. ($profile, $profile.CurrentUserAllHosts, etc)
Step 3: If the result of the previous command is false, the profile doesn’t exist so go to step 4. If the result is true, the profile file exists so go to step 5

Step 4: Since Profile doesn’t exist we will create one with the following command that you will type and press ENTER.
New-Item -Type File -Force $PROFILE.CurrentUserAllHosts

Step 5: The profile has been created and we can open Profile file in PowerShell ISE with the following command, and press ENTER.
ise $PROFILE.CurrentUserAllHostsStep 6: Empty Profile file has been opened in Windows PowerShell ISE
Step 7: Continue to Example 2 to see how to customize the profile.
We repeat the process for other profile types the only thing is to use the correct variable value in the Command column from Table 1 – PowerShell Profile types, commands, hosts, file names, file locations.
- $profile.AllUsersCurrentHost
- $profile.AllUsersAllHosts
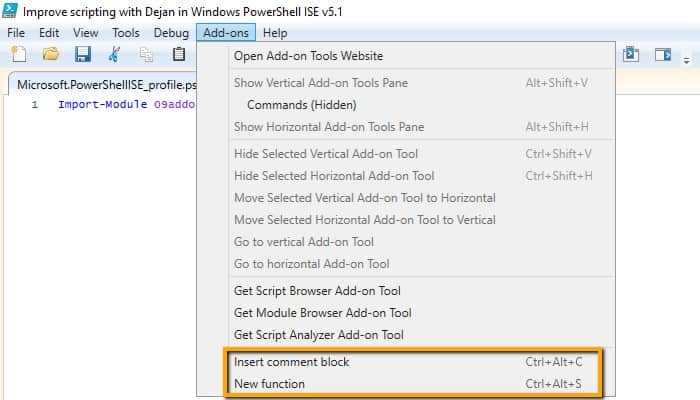
REMEMBER: When you want to create Profile for Windows PowerShell ISE as a host you need to open Windows PowerShell ISE and follow the steps running the commands from Windows PowerShell ISE Console (look the screenshot below)

How to Edit Windows PowerShell Profile with Examples
Example 1 – Profile for Console as Host and Current User (Current User – Current Host)
Profile Name: Microsoft.PowerShell_profile.ps1
Profile Location: $Home\[My]Documents\WindowsPowerShell\
Used for: In this example, I have changed the font background colors to be more readable.
Here is the code in Microsoft.PowerShell_profile.ps1 profile file. Just copy the code in the profile file and save the changes to have the same color schema or customize it to your like.
Set-PSReadLineOption -colors @{
  Operator           = 'Cyan'
  Parameter          = 'Cyan'
  String             = 'White'
}
On some older systems setting of Set-PSReadLineOption CmdLet was a little bit different like in the example below.
Set-PSReadlineOption -TokenKind String -ForegroundColor Magenta
Set-PSReadlineOption -TokenKind Operator -ForegroundColor Cyan
Set-PSReadlineOption -TokenKind Parameter -ForegroundColor Cyan
Font colors have been changed from this…
… to this.
Use Get-PSReadLineOption CmdLet to see the valid Color Arguments and current Argument values (colors).

Example 2 – Profile for both Windows PowerShell Console and ISE as Hosts (Current User – All Hosts)
Profile Name: profile.ps1
Profile Location: $Home\[My ]Documents\WindowsPowerShell\
Used for: When you want to customize both Windows PowerShell Console and ISE simultaneously or run own Advanced Functions or CmdLets in both PowerShell Console and ISE.
In this example, I load my own PowerShell Modules for some CmdLets that I have written which are part of the Efficiency Booster PowerShell Project. This project is a library of my own CmdLets organized in several modules and I highly recommend you to download the zip file of the project files and test in your own environment and be able to follow me along in the articles on this blog.
Here are commands to import the modules and content of the profile file.
Import-Module 02utils
Import-Module 03common
Import-Module 04maintenance
We can quickly test that imported modules are really loaded when we open the PowerShell Console using the following command:
Get-Module -ListAvailable
To understand better PowerShell Profiles, Modules and CmdLets interlinking please read the following subheading of this post How To Organize Your Own PowerShell CmdLets in PowerShell Modules And Which Profile To Use To Organize That Structure and How We Link Together PowerShell Profile, Module, And CmdLet.
Example 3 – Profile for ISE as Host (Current User – Current Host)
Profile Name: Microsoft.PowerShellISE_profile.ps1
Profile Location: $Home\[My ]Documents\WindowsPowerShell\
Used for: In this example, I have imported module that holds CmdLets which will be Add-ons for Window PowerShell ISE.
Here is the command that needs to be copied in the profile file.
Import-Module 09addons
As a result, we will have two Add-ons in Windows PowerShell ISE. Please read these two articles in order to know more about how to code them.
- How To Write Advanced Functions Or CmdLets With PowerShell (Fast)
- How To Write PowerShell Function’s Or CmdLet’s Help (Fast)
We can quickly test that imported modules are really loaded when we open the PowerShell Console using the following command:
Get-Module -ListAvailable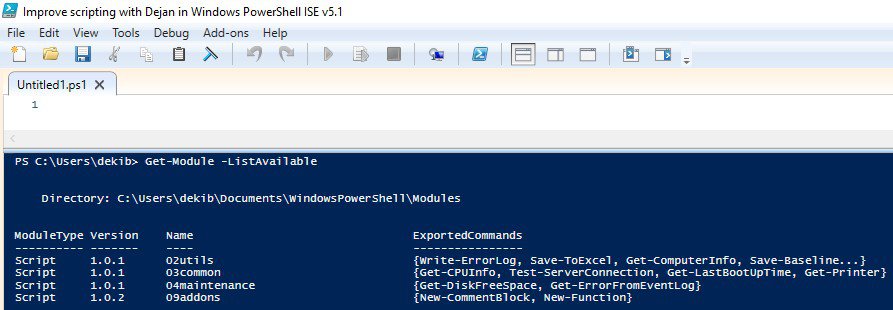
NOTE: Windows PowerShell ISE Imports four models from two profile files ( profile.ps1 and Microsoft.PowerShellISE_profile.ps1 ).
Example 4 – Profile For Both Windows PowerShell Console And ISE As Hosts (All Users – All Hosts)
Profile Name: profile.ps1
Profile Location: $PSHOME\
Used for: In this example, I have only changed the title of Window PowerShell Console and ISE for both Current User and Administrator.
Here is the code in Profile file:
$NTIdentity = [Security.Principal.WindowsIdentity]::GetCurrent()
$NTPrincipal = new-object Security.Principal.WindowsPrincipal $NTIdentity
$IsAdmin = $NTPrincipal.IsInRole([Security.Principal.WindowsBuiltInRole]::Administrator)

$hostversion="v$($Host.Version.Major).$($Host.Version.Minor)"
$hostname = $host.Name

IF ($IsAdmin)
{
    if($hostname -eq "ConsoleHost")
    {

        $host.ui.RawUI.WindowTitle = "Your Text in Windows PowerShell $hostversion - Running as ADMINISTRATOR"

    } else {

        $host.ui.RawUI.WindowTitle = "Your Text in Windows PowerShell ISE $hostversion - Running as ADMINISTRATOR"

    }
}
Else
{
    if($hostname -eq "ConsoleHost")
    {

        $host.ui.RawUI.WindowTitle = "Your Text in Windows PowerShell $hostversion"

    } else {

        $host.ui.RawUI.WindowTitle = "Your Text in Windows PowerShell ISE $hostversion"

    }

}
You can see that both PowerShell Console and ISE titles have a custom text, name of the host and version of PowerShell in the title.


Useful PowerShell Commands To Know Regarding Profiles
Here are some useful PowerShell commands that will help you to get information about profiles.
As a result of running any of the profile commands, you will get the location of the profile file.
$profile

$profile.AllUsersCurrentHost

$profile.CurrentUserAllHosts

$profile.AllUsersAllHosts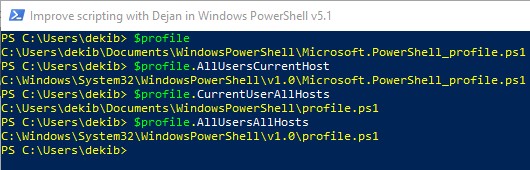
IMPORTANT: When you want to find the location of Profile file for Windows PowerShell ISE as a host you need to open Windows PowerShell ISE and run profile commands from Windows PowerShell ISE Console
Use Test-Path CmdLet to check if the profile file exists on the system or not. If you get True as a result profile exists and false means that profile file doesn’t exist. Use commands from Table 1 – PowerShell Profile types, commands, hosts, file names, file locations to check for other profile types whether they exist or not.
Test-Path $PROFILEThis line of code will create a profile file. Use commands from Table 1 – PowerShell Profile types, commands, hosts, file names, file locations to create other profile types.
New-Item -Type File -Force $PROFILE.CurrentUserAllHostsIf you want to read the content of the profile file either in Notepad or Window PowerShell ISE than use these two commands.
ise $PROFILE

notepad $PROFILE
Personally I prefer Windows PowerShell ISE since this is a more convenient environment for writing PowerShell code.
Use this line of code to get profile locations for all profile types.
$profile | Get-Member -Type NoteProperty | Select-Object Definition
Check these two variables to get the location of PowerShell installation and home directory respectively.
$pshome

$home
How To Choose Which Profile File To Use
If you use multiple host applications like Windows PowerShell Console and ISE, put all the customization in $PROFILE.CurrentUserAllHosts profile for the Current Logged On User. For example, I have created my own CmdLets organized into Modules so I put commands to load these modules in this profile since I want the modules to be loaded both when we open PowerShell Console and ISE. Look Example 2 for illustration.
If you want to do specific customization to the host application put all customization code in a profile specific to that host application. For example, I change the background color of PowerShell Console fonts so they are more visible or I have loaded modules that are Add-ons for ISE. I have shown that in Example 1 for the PowerShell Console and Example 3 for PowerShell ISE.
If you need to customize PowerShell for many users and you are an administrator than follow these tips:
- Store the most common customization in the $PROFILE.AllUsersAllHosts profile since this is the widest scope
- If you want to customize Windows PowerShell for all the users but specific to a host application. For example, different customization for Windows PowerShell Console and another customization for Windows PowerShell ISE then put the code in $PROFILE.AllUsersCurrentHost profiles
- Write the code for particular users in the user-specific profiles. Basically, that means using either $PROFILE.CurrentUserAllHosts or $PROFILE.CurrentUserCurrentHost profile.
How To Run Console Or ISE Without Profiles Loaded
Open the run dialog Win + R and open PowerShell with the -NoProfile option.
PowerShell.exe -NoProfileWarning: PowerShell Load Time
With a larger and more complex profile, it can start to have an effect on how quickly PowerShell opens. To troubleshoot whether or not your profile is responsible for poor PowerShell load times open the run dialog Win + R and open PowerShell with the -NoProfile option.
PowerShell.exe -NoProfileProfiles And Remote Sessions
PowerShell profiles are not run automatically in remote sessions, so the commands that the profiles add are not present in the remote session. In addition, the $PROFILE automatic variable is not populated in remote sessions.
To run a profile in a session, use the Invoke-Command CmdLet.
For example, the following command runs the “Current user, Current Host” profile from the local computer in the session in $s.
Invoke-Command -Session $s -FilePath $PROFILEHow To Organize Your Own PowerShell CmdLets in PowerShell Modules and Profiles
In order for you to understand the link between PowerShell Profile, Module and CmdLet I have created Efficiency Booster PowerShell Project with lots of my own CmdLets organized in a bunch of Modules which are loaded in each PowerShell Session with the PowerShell profile whenever I open Windows PowerShell Console or ISE.
Please feel free to download the zip file that contains the code for the project so you can easily follow along. In the ReadMe.txt file is an explanation of installation and customization steps so please read the instructions in that file. Even better you can read the installation and customization instructions reading the following article How To Install And Configure PowerShell: CmdLets, Modules, Profiles.
I will use bookstore, bookshelves and books analogy to explain the link between Powershell Profile, Module, and CmdLet.
For example, imagine that you want to learn more about PowerShell Scripting and you want to buy some books on the topic from the bookstore.
You walk into the bookstore and you see many shelves with different labels for book departments like Art, Business, Computers, Literature, Travel, etc. Of course, you walk to the shelves labeled Computers and there find the book that explains PowerShell Scripting which you want to buy.
Let’s back now to PowerShell world and link the analogy story with PowerShell:
- The CmdLet that we use delivered with PowerShell or some of our own written CmdLet is the book.
- Code of that CmdLet is the content of the book.
- PowerShell Module is the bookstore shelf of some bookstore department like for example Computers bookstore department shelf where our book is put.
- Finally, PowerShell Profile is the bookstore itself.
So every time we open Windows PowerShell Console or ISE we open our session and with that session profile files to load and customization have been done to set up our PowerShell environment the way we want to be.
In the case of Modules and CmdLets. Profile file will import modules and Module will load each CmdLet script that belongs to that Module.
Since I like to use my own CmdLets both in Windows PowerShell Console and ISE host applications I prefer to create a $profile.CurrentUserAllHosts profile type which is nothing but Profile.ps1 file created in:
- $Home\[My] Documents\WindowsPowerShell\ folder for PowerShell version 5.1 and older
- $Home\[My] Documents\PowerShell\ folder for PowerShell version 6.0.
How We Link Together PowerShell Profile, Module, And CmdLet
Here is a short description of that structure done in PowerShell
- Create a PowerShell profile
- Create a Module folder and file structure
- Customize the profile to import necessary modules
- Create CmdLet PowerShell script
- Write own CmdLet function code
- Customize Module file to import the CmdLet script
I will illustrate this process with Efficiency Booster PowerShell Project examples of Profile, Modules, and CmdLets so it is easier for anyone to understand the whole process. So I again strongly encourage everyone to install the zip file provided.
Follow these steps to create a PowerShell Profile, Module, CmdLet and link them together:
Step 1: Open the Windows PowerShell Console
Step 2: First, we will test if Profile exists or not in our PowerShell installation. Type the following command at the Window PowerShell, and press ENTER
Test-Path $PROFILE.CurrentUserAllHostsStep 3: If the result of the previous command is false, the profile doesn’t exist so go to step 4. If the result is true, the profile file exists so go to step 5
Step 4: Since Profile doesn’t exist we will create one with the following command that you will type and press ENTER.
New-Item -Type File -Force $PROFILE.CurrentUserAllHostsStep 5: The profile has been created and we can open Profile file in PowerShell ISE with the following command, and press ENTER.
ise $PROFILE.CurrentUserAllHostsStep 6: Profile file has been opened in PowerShell ISE.
Step 7: Now we need to create a Module folder structure and necessary files.
Step 8: In the folder where we created our Profile file create a Module folder with the exact name Modules. Here we will keep the folder structure of all our Modules.
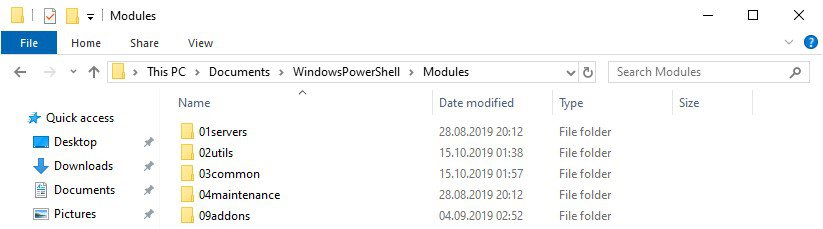
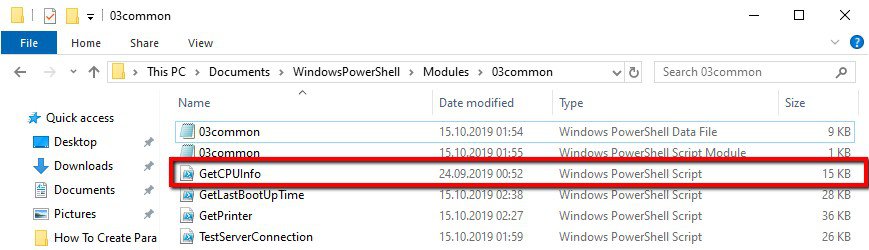
Step 9: In the Modules folder create the folders for each Module that you want to have. For example, I have created the following modules in Efficiency Booster PowerShell Project.
Step 10: In each Module folder we create the file with extension .psm1 and the exact same name as the Module folder. For example, in the 03common folder, we create 03common.psm1 file

Step 11: Optionally we can create a manifest file (.psd1 extension) for each module that will further describe that folder.
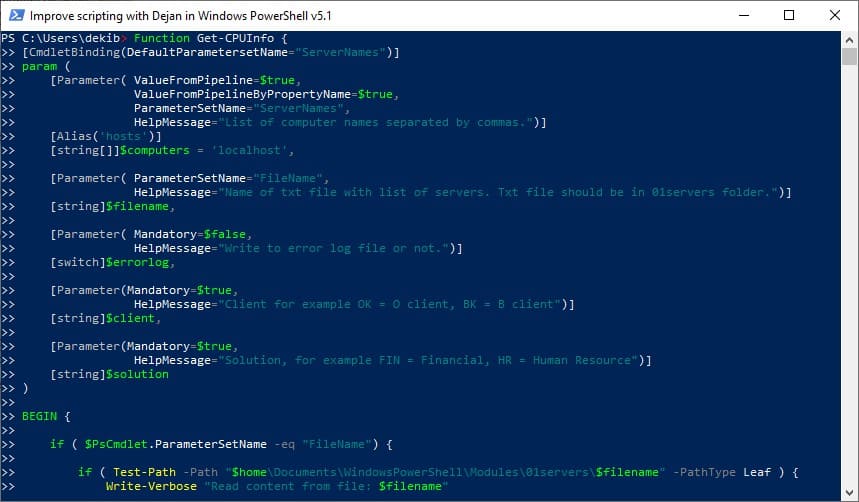
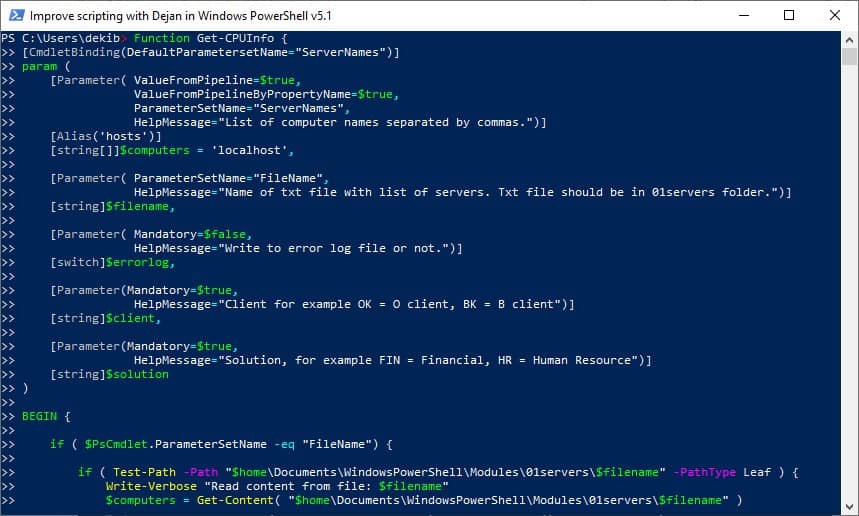
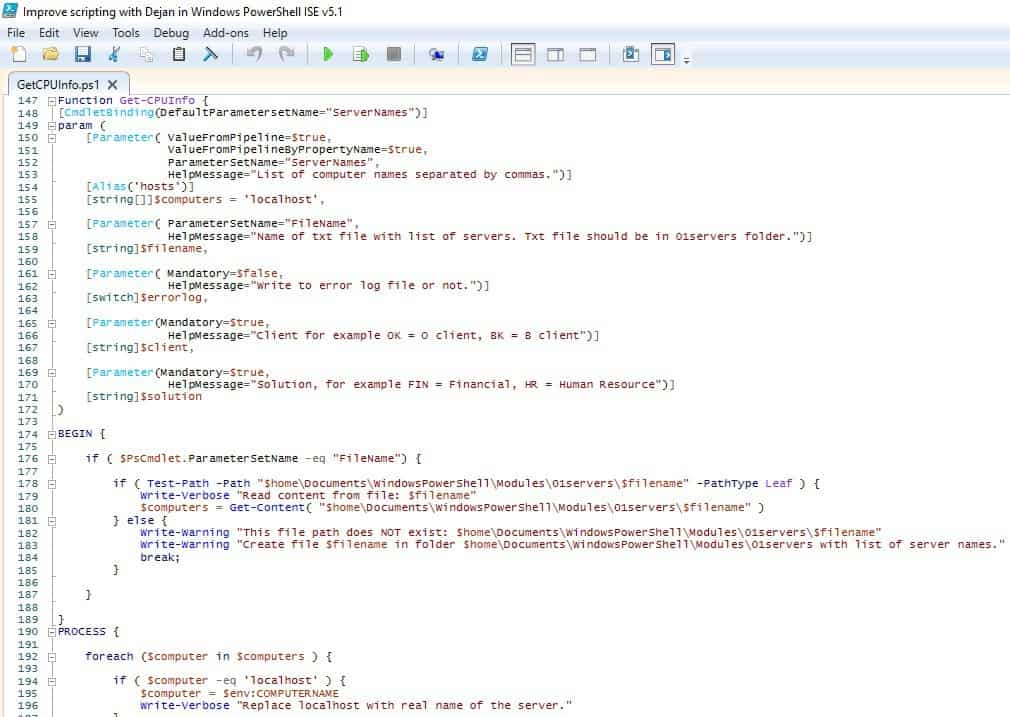
Step 12: In the same module folder, we create the file with .ps1 extension (Regular PowerShell script file) where we will write the code for our own CmdLet. For example, we can create the GetCPUInfo.ps1 file where we will write code for our own Get-CPUInfo CmdLet.
Step 13: Now we are ready to write our own CmdLet code and script it. Feel free to look into example Get-CPUInfo and other CmdLets of the Efficiency Booster PowerShell Project. In future posts, I will write more detail about each CmdLet in the project. For now, download the project source code here.
Step 14: Link a CmdLet script to the correct PowerShell Module. Open the Module’s .psm1 file and write this line of code:
. $psScriptRoot\NameOfCmdLetScriptFile.ps1
For example, for Get-CPUInfo CmdLet we write this line of code in 03common.psm1 file:
. $psScriptRoot\GetCPUInfo.ps1 
Step 15: In the Profile script file, we import the Module that contains our CmdLet script file so write this command in the profile file.
Import-Module ModuleName
For example, our Get-CPUInfo CmdLet is part of 03common module so we write this code in profile:
Import-Module 03common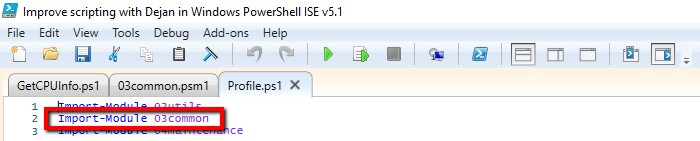
Step 16: We repeat the steps 9 -15 for every Module and CmdLet that we want to have in our profile and to be loaded with each PowerShell session that we start.
Step 17: We test that all imported modules are loaded when we open a certain host. We can list modules using the following command:
Get-Module -ListAvailable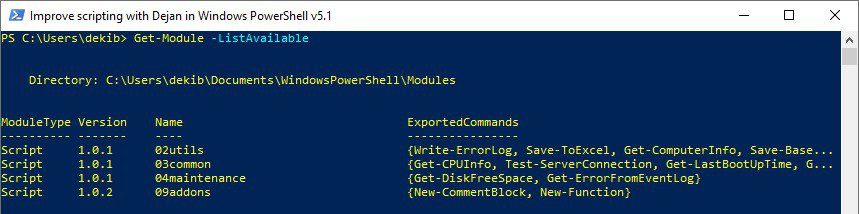
Step 18: We can test that all CmdLets within each module are loaded into the environment. Here is the useful example command:
Get-Command -Module 02utils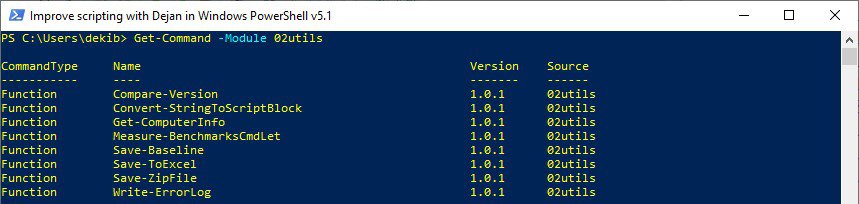
Useful PowerShell Profile Articles
Here are some useful articles and resources: