Writing PowerShell Function is not difficult but for some reason, some people are uncomfortable writing them. Do not worry this article will show you easy steps with examples so you can write your own functions with ease.
We want to write PowerShell Functions for reusability reasons and to replace the environment with many PowerShell scripts that need maintenance.
The goal is to replace many PowerShell Scripts with one script (or just a few) and keep the functionality of the scripts but replace them with many of our own PowerShell Functions that we can reuse over and over again.
This article will teach you to move from just writing PowerShell scripts into more reusable and better-organized coding techniques.
This article is Part 1 of the PowerShell Functions and CmdLets Series:
- Part 2: Easy Steps For Writing PowerShell Advanced Functions
- Part 3: How To Create A Custom PowerShell CmdLet (Step By Step)
Table of Contents
How To Write A PowerShell Function Step By Step
Let us first provide the steps and than the example that will follow the steps and help you illustrate the defined steps and embrace the steps with ease.
Here are the easy steps that we need to follow in order to create PowerShell Function:
- Open Windows PowerShell ISE or Visual Studio Code.
- In the new script file write the word function
- Followed by the function name.
- Take into consideration the PowerShell best practice and name the function in Approved Verb-Noun style.
- Remember to have a unique PowerShell function name.
- After function name open and close curly brackets {}.
- Within curly brackets write the code that will produce the desired result of the function.
- Implement Error Handling as needed.
- Save the code as a PowerShell script file (.ps1) so we can reuse the same code and call the function as needed.
- Test your PowerShell Function.
- Use PowerShell Debugging as needed.
- Extra Tip: Benchmark your PowerShell function execution performance.
- Optionally, write Comment-Based Help.
- Deploy your PowerShell Function in the production environment.
Here is Get-MDCPUInfo PowerShell Function example that will visualize the steps written above:
function Get-MDCPUInfo {

    Get-CimInstance -ComputerName localhost -Class CIM_Processor -ErrorAction Stop | Select-Object *

}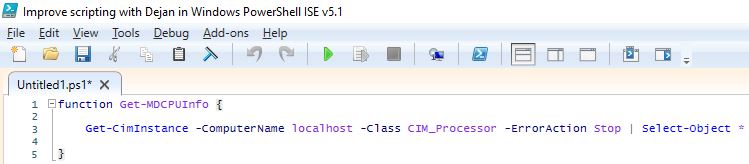
As we can see in the example above we have implemented the steps to write PowerShell Function:
- We have begun our script with the word function.
- After function word, we have defined our custom function name Get-MDCPUInfo that will be used later to call that specific function.
- Notice that we have used the Approved Verb-Noun PowerShell convention for naming the function. Approved Verb = Get and Noun = CPUInfo and MD my initials in front of the noun.
- One more thing to remember is that we need to have a unique function name so I have used the initials of my last and first name (MD).
- Next, we have opened and closed curly brackets {}.
- Within curly brackets, we have written a line of code that will produce the desired function result.
- In this example, we have used the CIM_Processor CIM class and called Get-CimInstance PowerShell CmdLet.
- The result of the above PowerShell CmdLet has been PowerShell Pipelined “|” to Select-Object PowerShell CmdLet that will return as a result CPU info from the local machine.
- Finally, we have saved our code as a PowerShell script on the machine’s hard drive. For example, SimpleFunctions.ps1 PowerShell script file.

Testing the PowerShell Function, we have covered in several subtopics of this article since this is a straightforward function example and we have covered more with more suitable examples in the following subtopics:
- How Can We Test The PowerShell Function
- How To Call PowerShell Function Written In PowerShell Script
- How To Call PowerShell Function With Input Parameter(s) In PowerShell Script
Regarding the rest of the optional steps in the list (Error Handling, Debugging, Benchmarking, and Comment-Based Help), we have covered them in the subtopic:
TIP: When naming your functions for the verb we need to use an approved verb and to get the list of approved verbs run this code:
Get-Verb | Sort-Object -Property Verb
Before we introduce some more complex examples of functions let’s discuss some important features of PowerShell Functions.
How To Call PowerShell Function Written In PowerShell Script
To call the function that we have just created in the PowerShell script file, we need to use a technique called “dot sourcing”. This technique might look counterintuitive but let me first show you the technique. Next, we can discuss why needs to be used and why a more logical approach is not possible.
Dot sourcing function call technique means we:
- Open PowerShell Console.
- type dot . first and make one space in the PowerShell Console.
- then we provide either an absolute or relative path to the script that contains the function.
- Press ENTER to run the script.
- Now, the function has been loaded so we can call it from the PowerShell Console.
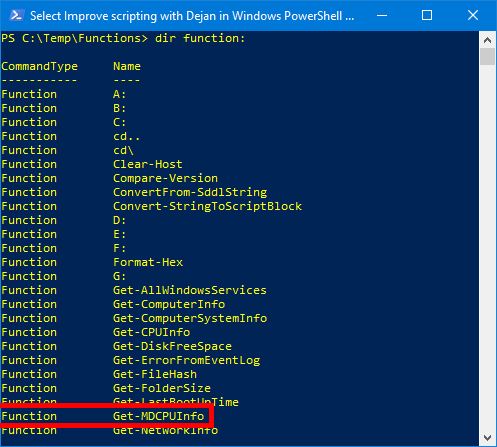
- To check that function(s) have been loaded use dir function:
- Call PowerShell Function and provide the names and values for all the input parameters as needed.
Here is an example that explains dot sourcing function call technique:
. .\SimpleFunctions.ps1
REMINDER: Since we are using a relative path to the script our PowerShell Console is at the folder where we have saved our SimpleFunctions.ps1 PowerShell Script.
If we press enter we will run the script and PowerShell will load the function into the PowerShell Console environment from the script.
We can check that the PowerShell function from the script has been loaded using the following syntax:
dir function:The result of the above code will list all the functions available for the current session of the PowerShell Console and among the other functions, we can see our Get-MDCPUInfo PowerShell function.
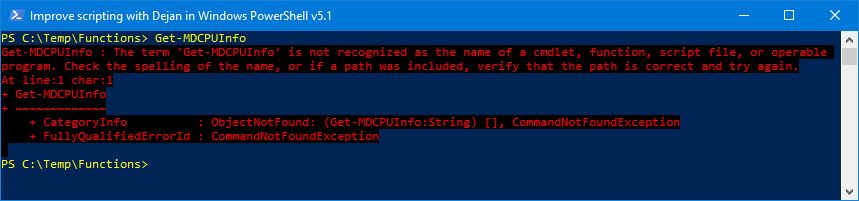
Now we can call our function and get the result of the function in the PowerShell Console. We simply need to run the following line of code without providing any input parameters since this simple example doesn’t have them:
Get-MDCPUInfoHere is the result of PowerShell Function Get-MDCPUInfo:

But we have to mention that the dot sourcing method for calling functions has a big disadvantage and you probably realized or have experienced that every time you close your PowerShell Console (session) and open again.
The issue is that we need to run dot sourcing code every time we open a new PowerShell Console and that is tedious and manual job that everyone wants to avoid.
The solution is to load the script using PowerShell Profiles and we have explained that at the end of this article.
REMINDER: Since we are using CIM Classes in our Function example we need WinRM Windows service configured, up, and running. To configure the WinRM please run the following line of code from the PowerShell Console as Administrator:
winrm quickconfig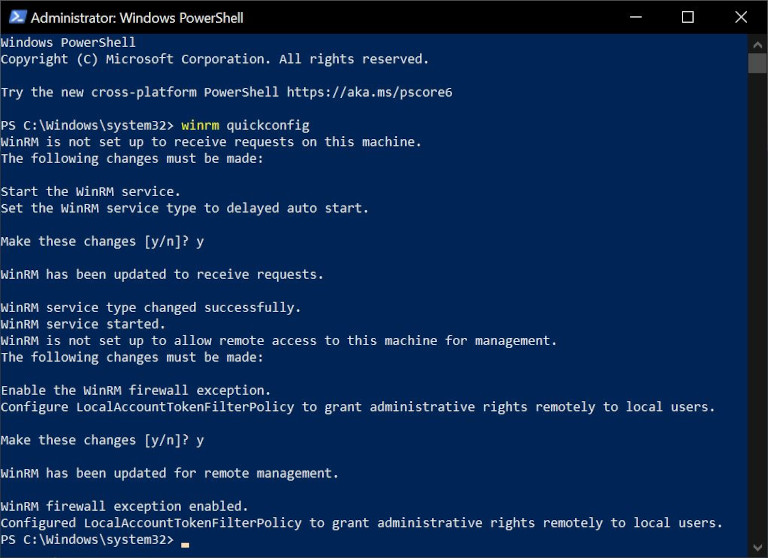
If we do not have WinRM Windows Service configured, up, and running we can be unpleasantly surprised with the error message that WinRM Service is either not running or not accepting requests.
How NOT To Call (And Why) PowerShell Function Written In PowerShell Script
Maybe you are wondering wouldn’t be more logical to just run the PowerShell script and running the script will load all the functions written in the script so we can finally call PowerShell Function(s) written within the script without using the dot sourcing technique that we have just discussed.
Well, what is logical for us humans is not necessarily logical for machines and especially not for the PowerShell Engine. Let me clarify that.
Let’s try just to run the PowerShell script. (We need to open a new PowerShell Console if we have already run the script with dot sourcing from the previous example).
.\SimpleFunctions.ps1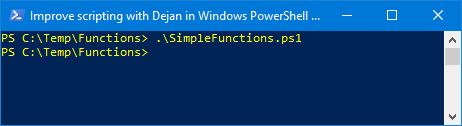
Next, let’s call the PowerShell Function that we have written in the PowerShell script.
Get-MDCPUInfoSurprisingly, we are getting the error instead of the PowerShell function result as we have expected.
Oops, why is this happening? Well, the answer lays in the PowerShell Script scope so let me explain that.
When we run the PowerShell Script (SimpleFunctions.ps1) PowerShell engine can see the code within the script as we have written at the beginning of this article.
function Get-MDCPUInfo {

    Get-CimInstance -ComputerName localhost -Class CIM_Processor -ErrorAction Stop | Select-Object *

}
As the PowerShell Engine runs our code it realizes that there is PowerShell Function in our script and says: OK, I understand that this script has PowerShell Function Get-MDCPUInfo but as soon as it reaches the end of the script since there is no function call it forgets that function even existed and just exit the script without remembering the PowerShell Function.
The conclusion is that PowerShell Function exists only within the PowerShell Script scope and not outside of it in the PowerShell Console so we cannot see it and use it in the PowerShell Console session.
We can check that using the following line of code that will list all the functions that exist within the PowerShell Console environment and we will not see the Get-MDCPUInfo function in that list.
dir function: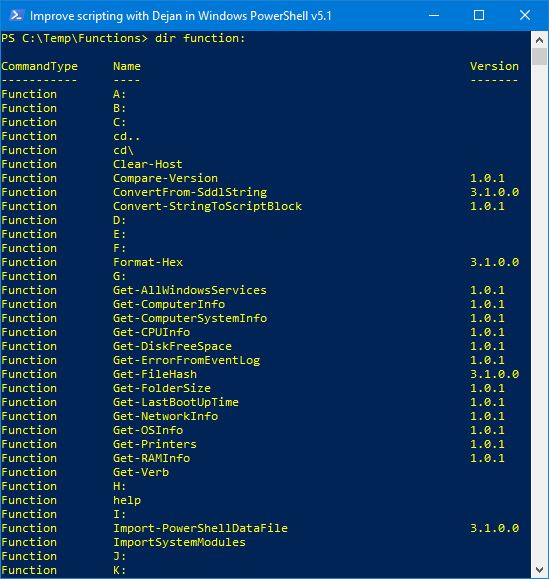
Our next thought might be to call the Get-MDCPUInfo PowerShell Function in the script. So let’s change our code and add the call to the function at the end of the script and see what the outcome will be.
function Get-MDCPUInfo {

    Get-CimInstance -ComputerName localhost -Class CIM_Processor -ErrorAction Stop | Select-Object *

}
Get-MDCPUInfo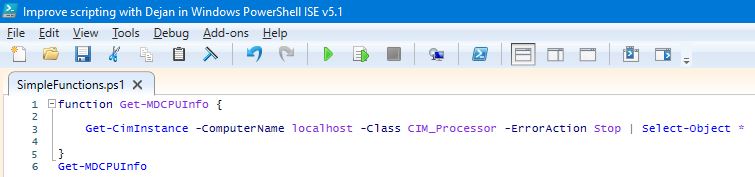
If we run the script again using the same line of code:
.\SimpleFunctions.ps1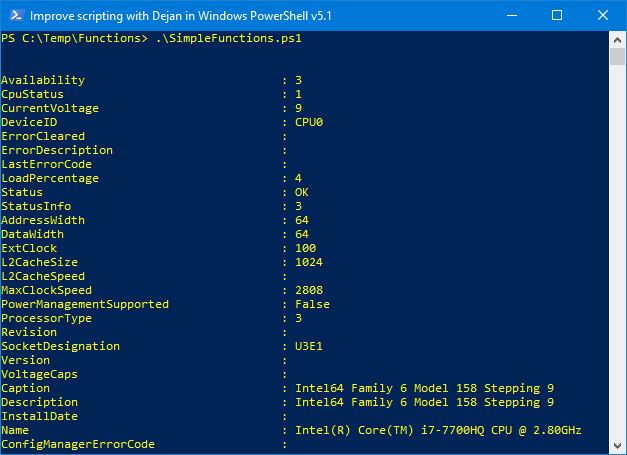
We will get the result from PowerShell Function since the PowerShell Engine will see the PowerShell Function and after function, it will call the function since that call is within the script but as soon as exits the script PowerShell Engine will forget that PowerShell Function exists and will not be possible to call again the function from the PowerShell Console.
Basically, we have got the result from the function but we did not load the function in our PowerShell Console environment so we still have a problem.
We can again check the list of the functions within the PowerShell Console function and the Get-MDCPUInfo function will not be on that list.
dir function:Here is the list of functions within the PowerShell Console Scope:
So if we try to call the Get-MDCPUInfo function it will give us an error as we have mentioned earlier in the article.
Get-MDCPUInfoHow We Declare A Parameter In PowerShell Function
When we have written our PowerShell Function very often there is a need to have one or more input parameters for the function so we can run the same functionality with different input values.
The simplest way to define input parameter to a PowerShell Function is to follow these steps:
- After open the curly bracket of the PowerShell Function write the param() keyword with brackets.
- Within the brackets write the name of the input parameter starting with the dollar sign $
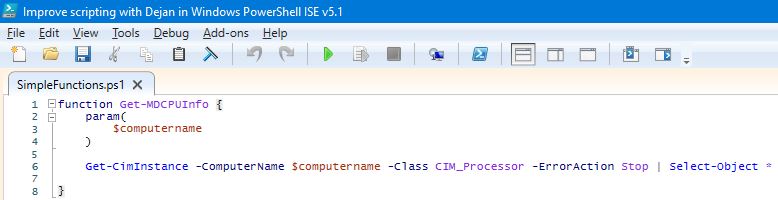
Let’s enhance our Get-MDCPUInfo PowerShell Function example by adding the input parameter with the name $computername:
function Get-MDCPUInfo {
    param(
        $computername
    )

    Get-CimInstance -ComputerName $computername -Class CIM_Processor -ErrorAction Stop | Select-Object *

}
It is that simple.
Notice that we have done two things:
- We have defined the input parameter within the param() PowerShell keyword, and
- we have implemented the input parameter variable $computername in function code as the value for Get-CimInstance CmdLet Computer Name parameter.
- We have replaced the ‘localhost’ value for the ComputerName parameter of Get-CimInstance CmdLet with the input parameter name $computername.
- Now we can call this function for computers in our network and not just localhost.
We can go one step further and improve our input parameter to accept the default value localhost.
function Get-MDCPUInfo {
    param(
        $computername = 'localhost'
    )

    Get-CimInstance -ComputerName $computername -Class CIM_Processor -ErrorAction Stop | Select-Object *

}
As you can see we have just added an equal sign after the parameter name with the default value $computername = ‘localhost’.
Using the default value for the input parameter allows us to either skip the value for the input parameter or if we forget to pass the value the default value will be used instead.
If we want to add one more input parameter to the function we just add comma at the end of first input parameter and repeat the process naming the second input parameter.
In the example below, we have added the second input parameter $errorvalue with the default value “Stop” and in addition, we have used the ValidationSet attribute to validate the input values and limit to five options.
function Get-MDCPUInfo {
    param(
        $computername = 'localhost',
        [ValidateSet("Continue", "Ignore", "Inquire", "SilentlyContinue", "Stop")]
        $errorvalue = "Stop"
    )

    Get-CimInstance -ComputerName $computername -Class CIM_Processor -ErrorAction $errorvalue | Select-Object *

}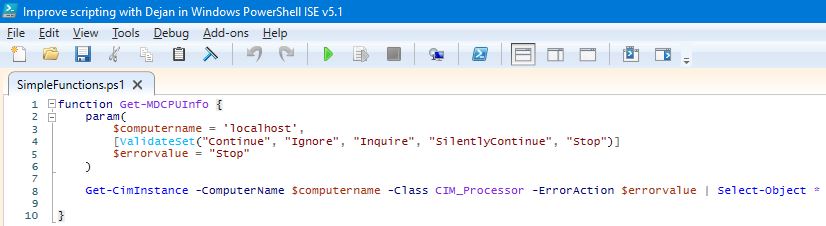
Within the function, we have implemented the second input parameter and replace the fix value “Stop” for the parameter ErrorAction with the input value variable $errorvalue. Now we have the possibility to manage error handling for the CmdLet Call.
There are many other features that we can more precisely define our input parameters and just to name a few:
- parameter data type
- parameter alias name
- parameter input values validation
- mandatory option for the input parameter
- parameter position
- and many others…
Since this article is not about PowerShell Function Parameters we will not continue with parameter examples but you will not be without necessary knowledge about PowerShell Functions Parameters since we have dedicated the whole article just about PowerShell Function Parameters with tones of useful examples
INFO: Please read the article “How To Create Parameters In PowerShell Step By Step” where you will not read just about parameters but also about PowerShell Splatting which is a very important feature of PowerShell.
How To Call PowerShell Function With Input Parameter(s) In PowerShell Script
Now when we have enhanced our starting PowerShell Function with input parameter let’s see how to call the function with the input parameter.
Again we will use the Dot sourcing function call technique and follow these steps:
- Open PowerShell Console.
- type dot . first and make one space in the PowerShell Console.
- then we provide either an absolute or relative path to the script that contains the function.
- Press ENTER to run the script.
- Now, the function has been loaded so we can call it from the PowerShell Console.
- To check that function(s) have been loaded use dir function:
- Call PowerShell Function and provide the names and values for all the input parameters as needed.
Here is an example that explains dot sourcing function call technique:
. .\SimpleFunctions.ps1If we press enter we will run the script and PowerShell will load the function into the PowerShell Console environment from the script.
We can check that the PowerShell function from the script has been loaded using the following syntax:
dir function:The result of the above code will list all the functions available for the current session of the PowerShell Console and among the other functions, we can see our Get-MDCPUInfo PowerShell function.
IMPORTANT: Now we are ready to call our function but this time we will provide the name of the input parameter and the value for the input parameter.
Now we can call our function, provide the input parameter (name and value), and get the result from the function in the PowerShell Console. We simply need to run the following line of code:
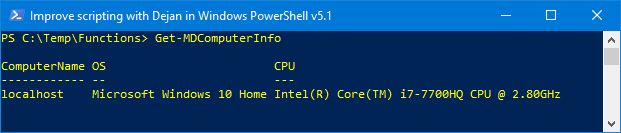
Get-MDCPUInfo -computername 'localhost'Here is the result of running above lines of code:

NOTE: Since we have defined our input parameter with the default value ‘localhost’ we can skip to provide the input parameter name and value and just call the function without the input parameter. PowerShell will realize that this input parameter has a default value and use it for the code execution within the function.
Get-MDCPUInfoHere is the result of PowerShell Function Get-MDCPUInfo:
How To Create Custom Output Objects In PowerShell Function
When we write our own PowerShell Function we can come up with the situation that we use different native PowerShell CmdLets and Functions in order to get the desired result. After getting the results from native PowerShell CmdLets, Functions, and even our own PowerShell Functions, why not, we want to combine them and create our own PowerShell Function result (output).
Well, that is exactly the scenario where we will need to make our own PowerShell Custom Object and use it to provide the result for our own PowerShell Function.
REMEMBER: PowerShell loves to work with objects more than any other data type (strings, numbers, etc.) so by making our PowerShell Custom Objects for the output we are pleasing PowerShell engine which is kind of nice :).
To make the PowerShell Custom Object basically we follow this pattern:
- Collect the results of calls to PowerShell CmdLets, Functions in the object variable.
- Use New-Object PowerShell CmdLet to create PowerShell Custom Object and save it in its own object variable.
- Use Add-Member PowerShell CmdLet to add each property that we want to present as output from our PowerShell Function
- Use Write-Output PowerShell CmdLet (we will discuss this step in our next subheading) to send PowerShell Function result.
Let me provide an easy example that will illustrate all the written text above and be more explanatory and understandable to you.
Here is the example PowerShell Function Get-MDComputerInfo that will provide Custom Output Objects:
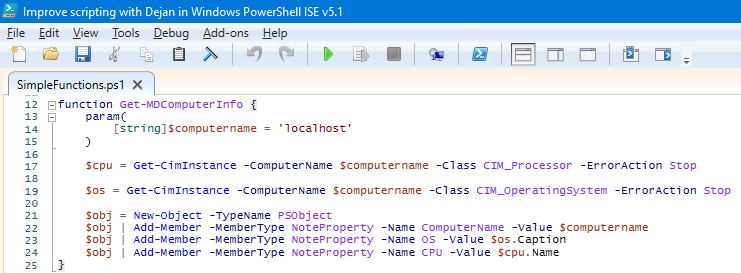
function Get-MDComputerInfo {
    param(
        [string]$computername = 'localhost'
    )

    $cpu = Get-CimInstance -ComputerName $computername -Class CIM_Processor -ErrorAction Stop

    $os = Get-CimInstance -ComputerName $computername -Class CIM_OperatingSystem -ErrorAction Stop

    $obj = New-Object -TypeName PSObject
    $obj | Add-Member -MemberType NoteProperty -Name ComputerName -Value $computername
    $obj | Add-Member -MemberType NoteProperty -Name OS -Value $os.Caption
    $obj | Add-Member -MemberType NoteProperty -Name CPU -Value $cpu.Name
}
Let me quickly explain the code above so we are on the same page.
- We have written the function Get-MDComputerInfo.
- Get-MDComputerInfo Function has one input parameter:
- with the name $computername,
- the parameter data type is a string,
- the parameter default value is localhost.
- in the object variable $cpu we collect the data about the computer’s CPU using CIM-Processor CIM Class and Get-CimInstance PowerShell CmdLet.
- in the object variable $os we collect the data about the computer’s Operating System using CIM_OperatingSystem CIM Class and Get-CimInstance PowerShell CmdLet.
- We define PowerShell Custom Object using New-Object PowerShell CmdLet and save it in $obj variable.
- We use Add-Member PowerShell CmdLet to add properties to our custom PowerShell object that will be shown in the function output result:
- First, we add Computer Name,
- Second, we add the Operating System Name (Caption),
- Third, we add the CPU name.
CONCLUSION: Since we are using data from three different sources input parameter, CPU, and OS PowerShell CmdLets and than combine them to make the function output (result) we need to create Custom Object than collect all these data as Custom Object Members (Properties) and output from the function to the user of our PowerShell Function.
REMEMBER: PowerShell likes to work with objects so we make Custom Object to comply with PowerShell preferred data type.
Now we are almost ready. The last thing that we need to do is to output the value from Custom Object and that we will discuss shortly in the next subheading.
But before we move on to output let me show you one more way to create custom objects using PowerShell Splatting. PowerShell Splatting makes the code neatly written and my personal choice of writing PowerShell code.
function Get-MDComputerInfo_Splatting {
    param(
        [string]$computername = 'localhost'
    )

    $paramsCPU = @{ 'ComputerName'=$computername;
                 'Class'='CIM_Processor';
                 'ErrorAction'='Stop'}

    $cpu = Get-CimInstance @paramsCPU

    $paramsOS = @{ 'ComputerName'=$computername;
                'Class'='CIM_OperatingSystem';
                'ErrorAction'='Stop'}

    $os = Get-CimInstance @paramsOS

    $properties = @{'Computer Name'=$computername;
                    'OS Name'=$os.Caption;
                    'CPU Name'=$cpu.Name
                    }

    $obj = New-Object -TypeName PSObject -Property $properties
}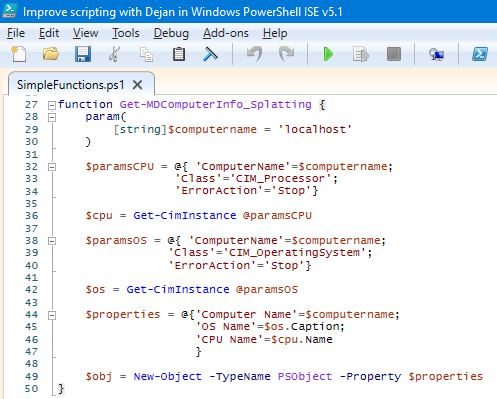
PowerShell Splatting is very useful when we need to pass lots of parameters to some PowerShell CmdLet as we did in this example to Get-CimInstance CmdLet.
INFO: We have already written an explanation of PowerShell Splatting in the article About Splatting so please read more about this interesting feature there.
How To Output From PowerShell Function
In our previous subheading, we have created a custom object for our PowerShell Function and now it is time to output that object to the consumers of our PowerShell Function.
In PowerShell, we will use Write-Output PowerShell CmdLet although PowerShell has a return keyword that is more suitable in some other programming languages we will not use it in this case and I will explain why in a bit.
Basically, what we need to do to output our PowerShell Custom Object is to add at the end Write-Output $obj code that will send the output to the consumers.
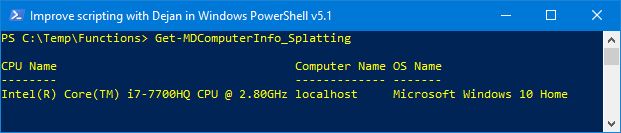
We continue to enhance our example functions from the previous subheading and here is the code for our PowerShell Functions Get-MDComputerInfo and Get-MDComputerInfo_Splatting with output feature:
function Get-MDComputerInfo {
    param(
        [string]$computername = 'localhost'
    )

    $cpu = Get-CimInstance -ComputerName $computername -Class CIM_Processor -ErrorAction Stop

    $os = Get-CimInstance -ComputerName $computername -Class CIM_OperatingSystem -ErrorAction Stop


    $obj = New-Object -TypeName PSObject
    $obj | Add-Member -MemberType NoteProperty -Name ComputerName -Value $computername
    $obj | Add-Member -MemberType NoteProperty -Name OS -Value $os.Caption
    $obj | Add-Member -MemberType NoteProperty -Name CPU -Value $cpu.Name

    Write-Output $obj

}
function Get-MDComputerInfo_Splatting {
param(
[string]$computername = 'localhost'
)
$paramsCPU = @{ 'ComputerName'=$computername;
'Class'='CIM_Processor';
'ErrorAction'='Stop'}
$cpu = Get-CimInstance @paramsCPU
$paramsOS = @{ 'ComputerName'=$computername;
'Class'='CIM_OperatingSystem';
'ErrorAction'='Stop'}
$os = Get-CimInstance @paramsOS
$properties = @{'Computer Name'=$computername;
'OS Name'=$os.Caption;
'CPU Name'=$cpu.Name
}
$obj = New-Object -TypeName PSObject -Property $properties
Write-Output $obj
}Basically, we have just added at the end of function Write-Output $obj which will write the output of the variable $obj that holds our PowerShell Custom Object which we have created in the previous subheading.
We have already learned how to call PowerShell Function so we do not need to repeat that again here so last thing is to show the results.
We can output Function result but in addition, we can also send the result down the PowerShell Pipeline for further processing to shape our output in different formats such as:
Here we show the result as formatted table:
Get-MDComputerInfo | Format-Table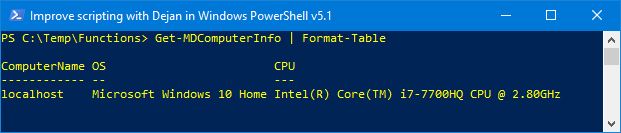
Here we can output as HTML page:
Get-MDComputerInfo | ConvertTo-Html | Out-File output.html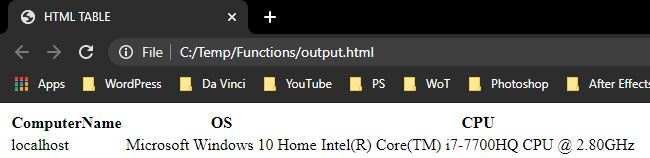
Here we can output to csv file
Get-MDComputerInfo | ConvertTo-Csv | Out-File output.csv
We can even send the output to our own PowerShell Functions if we have them.
Get-MDComputerInfo | Save-ToExcel -ExcelFileName "Get-MDComputerInfo" -title "Get Computer Info " -author "ImproveScripting.com With Dejan" -WorkSheetName "Computer Info" -client "OK" -solution "FIN"
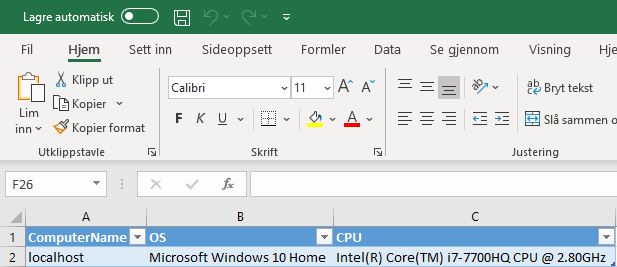
We PowerShell Pipeline the result of Get-MDComputerInfo PowerShell Function to our own PowerShell CmdLet Save-ToExcel which will create an Excel Sheet as a result.
If you are interested in how to create Excel Sheet for your function results please read the article “How To Create, Write And Save An Excel File Using PowerShell“.
Why We Are Not Using Return Keyword To Output From PowerShell
I have already mentioned that PowerShell has a return keyword like many other programming languages but the return is not the best option to output values in PowerShell as it is in some other programming languages.
The main reason is when we use the return keyword PowerShell will immediately exit our function which we most of the time do not want.
Very often we will go in some kind of loop to read the data returned from native PowerShell CmdLets or functions. In that case, Write-Output is a better solution since Write-Output will output one object at a time, and as long as there are objects in the loop.
The return will exit the function after reading the first object in the loop so we will not get the complete result from the function.
Here are two examples one using Write-Output and the other using the return keyword and we would like you to pay attention to outputs of these functions.
On my machine, I have two physical memory slots used so the call to CIM_PhysicalMemory CIM Class will return two objects into the variable $RAMs.
Since we have two objects as result we use the PowerShell foreach loop to read the data from both objects and output as PowerShell Custom Objects using Write-Output PowerShell CmdLet.
As we know Write-Output will not exit the PowerShell Function and we will get in our output both memory slots data.
function Get-MDRAM {
param(
[string]$computername = 'localhost'
)
$params = @{ 'ComputerName'=$computername;
'Class'='CIM_PhysicalMemory';
'ErrorAction'='Stop'}
$RAMs = Get-CimInstance @params | Select-Object Caption,
@{Name="RAM size(GB)";Expression={("{0:N2}" -f($_.Capacity/1gb))}}
foreach ($RAM in $RAMs) {
$properties = @{'Computer Name'=$computername;
'RAM'=$RAM.Caption;
'RAM size(GB)'=$RAM."RAM size(GB)"
}
$obj = New-Object -TypeName PSObject -Property $properties
Write-Output $obj
}
}On the other hand, when we use the return PowerShell keyword as soon as the first object has been read the return will order the PowerShell Engine to immediately exit the PowerShell Function.
So the second object has not been output and we did not get the complete and accurate result.
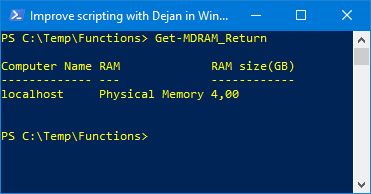
function Get-MDRAM_Return {
param(
[string]$computername = 'localhost'
)
$params = @{ 'ComputerName'=$computername;
'Class'='CIM_PhysicalMemory';
'ErrorAction'='Stop'}
$RAMs = Get-CimInstance @params | Select-Object Caption,
@{Name="RAM size(GB)";Expression={("{0:N2}" -f($_.Capacity/1gb))}}
foreach ($RAM in $RAMs) {
$properties = @{'Computer Name'=$computername;
'RAM'=$RAM.Caption;
'RAM size(GB)'=$RAM."RAM size(GB)"
}
$obj = New-Object -TypeName PSObject -Property $properties
return $obj
}
}Here is the output from both functions:

Development Vs Production Of PowerShell Function
When we are writing our PowerShell Functions we can use either Windows PowerShell ISE or Visual Studio Code or some other software development environment (application) that we are familiar with.
When we are in the development phase we want to have the call to the function in our script so we can easily test and debug our code in the development environment like in the example code below:
function Get-MDCPUInfo {
Get-CimInstance -ComputerName localhost -Class CIM_Processor -ErrorAction Stop | Select-Object *
}
Get-MDCPUInfoOf course, when we have been finished with the development of our PowerShell Function and ready to deploy it in a production environment we will comment out the calls to the PowerShell Function like in the following example code:
function Get-MDCPUInfo {
Get-CimInstance -ComputerName localhost -Class CIM_Processor -ErrorAction Stop | Select-Object *
}
#Get-MDCPUInfoThere are many other things that we might need to take into consideration while writing our PowerShell Functions in the development phase and just to name a few:
- Debug PowerShell Function code.
- Benchmark the performance of our PowerShell Functions if we have some really complex and long-running functions.
- Error Handling and Logging Errors in the external text error log file.
- Comment-Based Help for our PowerShell Functions.
We have already written the articles that cover the above topics so no need to repeat ourselves here but we strongly encourage each and every one of you to read them so you can get comprehensive knowledge about PowerShell Functions.
Learn to Debug PowerShell code with examples, be more efficient while debugging by using the right shortcut key, and many more to cover in the article “How To Debug PowerShell Scripts“.

Sometimes PowerShell functions can be very complex and perform poorly (read, run very long time) or if we want to be really serious about writing our own PowerShell Function we will benchmark our PowerShell Function code anyway.
By benchmarking our code, we will know about how it was performing at the start of the production life, and if performance deteriorates we have some base to compare with.
We have written an article that provides several techniques on how to benchmark the code and probably one of them will suit your needs so please read the article “How To Benchmark Scripts With PowerShell“.

No one likes code that breaks and makes too many errors so we need to pay close attention to error handling and improving the quality of our code.
We have written a very popular article on our blog “How To Log PowerShell Errors And Much More” that shows how to properly error handle PowerShell code and write errors in an external text file for further analysis that will eventually after fixing the collected errors improve the quality of our code.
Documenting the work is usually neglected and postponed when we have time to do it and most of the time is not the right time to do it. Writing the Comment-Based Help for the functions in PowerShell is not that difficult and makes the written code extremely user friendly and professional.
We have written an article that explains step by step how to write comment-based help for PowerShell Functions so please read it. “Step By Step Approach How To Write Comment-Based Help For PowerShell Scripts And CmdLets“

Can We Have Multiple Functions In One PowerShell Script And How
We can have multiple functions in one PowerShell script and basically that is the point of using PowerShell Functions instead of writing many individual PowerShell scripts with some code and functionality that are ultimately hard to maintain.
When I was a beginner in the PowerShell world I have written many PowerShell scripts and very early has realized that I have a problem with too many scripts.
So the next phase was to replace all these scripts with one or a few scripts and within each script to write many PowerShell Functions that will replace each individual PowerShell script that I had.
Although this is a much better solution it is not the best and our ultimate goal is to learn to write our own PowerShell CmdLets that will be organized in different PowerShell Modules and loaded using PowerShell Profiles each time we start either PowerShell Console or PowerShell ISE.
Ultimately we want to achieve that each of our own PowerShell Functions has the same look and feel as native PowerShell CmdLet.
You are on the right track to achieve that so please read all the articles in the series about your own:
- Part 1: PowerShell Functions,
- Part 2: Advanced Functions, and
- Part 3: CmdLets.
But let’s come back to the topic of having multiple functions in one PowerShell Script. Throughout this article, we have already written several PowerShell functions and we put them all together in one script and save them as a PowerShell script file (SimpleFunctions.ps1) we have achieved exactly what we want.
Here are the functions that we have written so far and just copy the code and save it as PowerShell Script files (.ps1) and we are done.
function Get-MDCPUInfo {
param(
$computername = 'localhost'
)
Get-CimInstance -ComputerName $computername -Class CIM_Processor -ErrorAction Stop | Select-Object *
}
#Get-MDCPUInfo -computername 'localhost'
#Get-MDCPUInfo
function Get-MDComputerInfo {
param(
[string]$computername = 'localhost'
)
$cpu = Get-CimInstance -ComputerName $computername -Class CIM_Processor -ErrorAction Stop
$os = Get-CimInstance -ComputerName $computername -Class CIM_OperatingSystem -ErrorAction Stop
$obj = New-Object -TypeName PSObject
$obj | Add-Member -MemberType NoteProperty -Name ComputerName -Value $computername
$obj | Add-Member -MemberType NoteProperty -Name OS -Value $os.Caption
$obj | Add-Member -MemberType NoteProperty -Name CPU -Value $cpu.Name
Write-Output $obj
}
#Get-MDComputerInfo
function Get-MDComputerInfo_Splatting {
    param(
        [string]$computername = 'localhost'
    )

    $paramsCPU = @{ 'ComputerName'=$computername;
                 'Class'='CIM_Processor';
                 'ErrorAction'='Stop'}


    $cpu = Get-CimInstance @paramsCPU

    $paramsOS = @{ 'ComputerName'=$computername;
                'Class'='CIM_OperatingSystem';
                'ErrorAction'='Stop'}

    $os = Get-CimInstance @paramsOS

    $properties = @{'Computer Name'=$computername;
                    'OS Name'=$os.Caption;
                    'CPU Name'=$cpu.Name
                    }

    $obj = New-Object -TypeName PSObject -Property $properties

    Write-Output $obj

}
#Get-MDComputerInfo_Splatting
function Get-MDRAM {
    param(
        [string]$computername = 'localhost'
    )

    $params = @{ 'ComputerName'=$computername;
                 'Class'='CIM_PhysicalMemory';
                 'ErrorAction'='Stop'}


    $RAMs = Get-CimInstance @params | Select-Object   Caption,
                                        @{Name="RAM size(GB)";Expression={("{0:N2}" -f($_.Capacity/1gb))}}

    foreach ($RAM in $RAMs) {

        $properties = @{'Computer Name'=$computername;
                        'RAM'=$RAM.Caption;
                        'RAM size(GB)'=$RAM."RAM size(GB)"
                        }

        $obj = New-Object -TypeName PSObject -Property $properties

        Write-Output $obj
    }
}
#Get-MDRAM
function Get-MDRAM_Return {
    param(
        [string]$computername = 'localhost'
    )

    $params = @{ 'ComputerName'=$computername;
                 'Class'='CIM_PhysicalMemory';
                 'ErrorAction'='Stop'}


    $RAMs = Get-CimInstance @params | Select-Object   Caption,
                                        @{Name="RAM size(GB)";Expression={("{0:N2}" -f($_.Capacity/1gb))}}

    foreach ($RAM in $RAMs) {

        $properties = @{'Computer Name'=$computername;
                        'RAM'=$RAM.Caption;
                        'RAM size(GB)'=$RAM."RAM size(GB)"
                        }

        $obj = New-Object -TypeName PSObject -Property $properties

        return $obj
    }
}
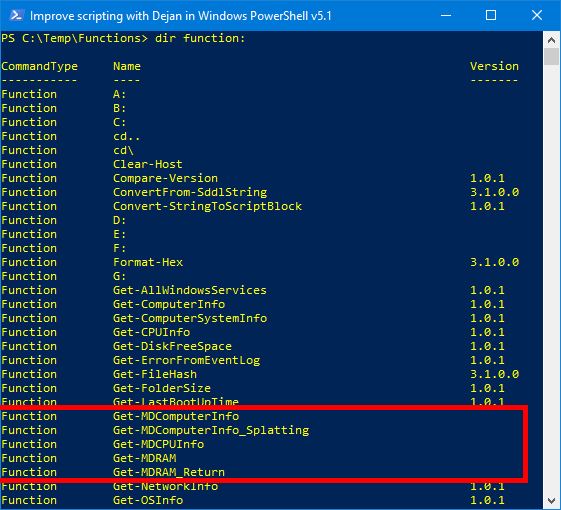
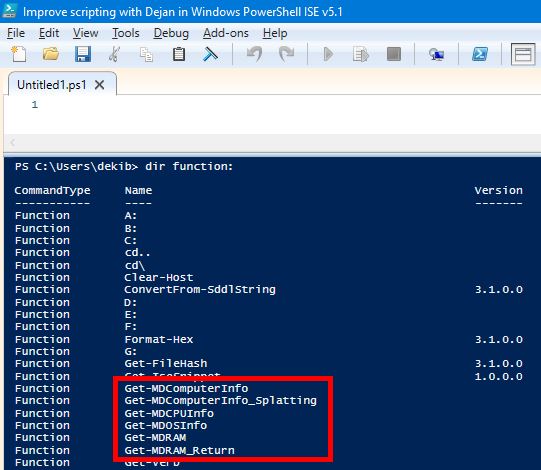
#Get-MDRAM_ReturnWe have already learned how to load the functions in the PowerShell Console environment (Remember subheading “How To Call PowerShell Function Written In PowerShell Script“) so no need to repeat that. After loading the functions we can check with
dir function:that our functions have been loaded as you can see on the screenshot below.
Now we can start calling each PowerShell function as needed.
How To Write PowerShell Pipeline Function Step By Step
So far we have learned to write the regular PowerShell Function but this function will not accept values from PowerShell Pipeline which is a really important feature of PowerShell.
Let’s learn how to enhance our simple PowerShell Function Example into the PowerShell Pipeline Function.
Here is our simple PowerShell Function example Get-MDOSInfo that we will convert into PowerShell Pipeline Function:
function Get-MDOSInfo {
    param(
        [string]$computername = 'localhost'
    )

    $params = @{ 'ComputerName'=$computername;
                'Class'='CIM_OperatingSystem';
                'ErrorAction'='Stop'}

    $os = Get-CimInstance @paramsOS

    $properties = @{'Computer Name'=$computername;
                    'OS Name'=$os.Caption;
                    'OS Version'=$os.Version;
                    '64 or 32 bits'=$os.OSArchitecture
                    }

    $obj = New-Object -TypeName PSObject -Property $properties

    Write-Output $obj
}
First, we will provide the steps and second we will provide example that will enhance the above example PowerShell Function.
Here are the steps to write PowerShell Pipeline Function:
- Open Windows PowerShell ISE or Visual Studio Code
- Define the function and write the PowerShell keyword function
- Give the function a name:
- Use Approved Verb-Noun PowerShell naming convention,
- make the function name unique.
- Open and close curly brackets { } where we will write the rest of our code.
- Define one or more input parameters.
- Write param() PowerShell keyword and inside brackets, we will define our input parameter(s)
- Give an input parameter a name starting with the dollar sign $
- Use some array data type for the input parameter,
- Allow Value From Pipeline feature for the input parameter (as needed),
- Allow Value From Pipeline By Property Name for the input parameter (as needed),
- Optionally, give a default value to the input parameter.
- Define Input Methods for PowerShell Pipeline in the function body:
- Write function code in each of the above input methods as needed.
- Usually, most of the code is in the PROCESS {} input method.
- Save our function as PowerShell Script (.ps1 file)
- Test your PowerShell Function.
- Optionally, implement Error Handling in your code as needed.
- Optionally, write comment-based help for your function.
- Optionally, define Execution Examples region.
- Use PowerShell Debugging as needed while testing.
- EXTRA TIP: Benchmark your function execution performance for future reference.
- Deploy your PowerShell Pipeline Function in the production environment.
Let’s follow each of above steps and write our own PowerShell Pipeline Function using the example Get-MDOSInfo PowerShell Function.
Step 1: Open Windows PowerShell ISE or Visual Studio Code
For this example we will use Windows PowerShell ISE and open new PowerShell Script window in the environment
Step 2: Define Function writing the word function
functionStep 3: Give the function a name
function Get-MDOSInfo We have followed all the PowerShell function naming guidance:
- Used Approved Verb in the name Get
- Used Noun in the name OSInfo
- Used Initials to make the function name unique MD
Step 4: Open and close the curly brackets after the function definition
function Get-MDOSInfo { }Step 5: Define one or more input parameters.
In our next step, we will define input parameters and each parameter should be separated with a comma “,“.
Step 6: Write a param() keyword within curly brackets.
function Get-MDOSInfo {
      param()
}- Give a name to an input parameter starting with dollar sign $
function Get-MDOSInfo {
    param(
        $computername
    )
}- Use some array data type for input parameter.
function Get-MDOSInfo {
    param(
        [string[]]$computername
    )
}NOTE: We use the array data type since we want to be able to pass several values for the input parameter and not just one. In this case, we decided to use a string array string[ ].
- Allow both Values From Pipeline and Values From Pipeline By Property Name.
We will use Parameter attribute and two arguments with argument values set to true.
function Get-MDOSInfo {
    param(
        [Parameter( ValueFromPipeline=$true,
                    ValueFromPipelineByPropertyName=$true)]
        [string[]]$computername
    )
}
When we test the function we will see how both Pipeline methods work.
INFO: It is not mandatory to use both Pipelines (By Value or By Property Name) but we need to use one of them.
- Optionally, give a default value to the input parameter.
We dedicated localhost as default value for our input parameter.
function Get-MDOSInfo {
    param(
        [Parameter( ValueFromPipeline=$true,
                    ValueFromPipelineByPropertyName=$true)]
        [string[]]$computername = 'localhost'
    )
}
Step 7: Define Input Methods for PowerShell Pipeline in the function body
function Get-MDOSInfo {
    param(
        [Parameter( ValueFromPipeline=$true,
                    ValueFromPipelineByPropertyName=$true)]
        [string[]]$computername = 'localhost'
    )
    BEGIN {}
    PROCESS {}
    END{}
}
BEGIN {} and END{} are executed only once and in this particular case they can be excluded from the code since there will be no code in them but for readability reasons we usually keep them anyway.
PROCESS {} is executed for each object sent through the PowerShell pipeline and that is very important to make our simple function to become the PowerShell pipeline function.
Step 8: Write the function code
In each of the above-defined input methods, we could write the function code. It is not necessary to write the code in each input method only at least in one.
In this case we will have only written the code within the PROCESS input method.
function Get-MDOSInfo {
    param(
        [Parameter( ValueFromPipeline=$true,
                    ValueFromPipelineByPropertyName=$true)]
        [string[]]$computername = 'localhost'
    )
    BEGIN {}
    PROCESS {

        foreach ($name in $computername){
            $params = @{ 'ComputerName'=$name;
                        'Class'='CIM_OperatingSystem';
                        'ErrorAction'='Stop'}

            $os = Get-CimInstance @params

            $properties = @{'Computer Name'=$name;
                            'OS Name'=$os.Caption;
                            'OS Version'=$os.Version;
                            '64 or 32 bits'=$os.OSArchitecture
                            }

            $obj = New-Object -TypeName PSObject -Property $properties

            Write-Output $obj
        }
    }
    END{}
}
Let me just quickly explain the code in the PROCESS input method.
- We are making the loop with the foreach PowerShelll keyword in order to process all the values that can be passed to the input parameter $computername.
- For each object, we call CIM_OperatingSystem CIM Class using Get-CimInstance PowerShell CmdLet in order to get Operating System information on each machine.
- We create Custom PowerShell Object with properties that we want to show in our output (Operating System Name, Version Architecture, Computer Name).
- Finally, we output a custom PowerShell object using Write-Output PowerShell CmdLet for each object passed through the PowerShell Pipeline.
REMINDER: PowerShell likes working with objects so we comply with that using PowerShell Custom Objects for our output.
Step 9: Save our function as PowerShell Script (.ps1 file)
We saved the script as PipelineFunction.ps1
Step 10: Test your PowerShell Function.
We will test our function with different calls to the function and each call will test a particular feature of the Pipeline Function. Our next subheading is dedicated to the testing phase in PowerShell Function development.
Steps 11-16: Error Handling, Comment-Based Help, Regions, Debugging, Benchmark, And Deployment
We have covered each of these steps in the following subtopics of this article and pointing out to other articles on our blog that cover these topics in more depth.
So please read the following subtopics for more comprehansive knowledge about each of them:
For a more comprehensive explanation of PowerShell Pipeline Feature and BEGIN, PROCESS, END input parameters we have written dedicated articles with examples so please read them as needed.

How Can We Test The PowerShell Function
We have written our PowerShell Pipeline Function in the previous subheading so now it is time to test our function and verify that each feature that we have scripted works as supposed to work.
Basically, we have two ways of testing our PowerShell Function.
- First, we can use the dot source method and run the script, and test from the PowerShell Console.
- Second, since we are in the development phase we can write function calls directly in the Windows PowerShell ISE script window and run from there.
- When we are done with testing we will comment out each call or even better make Execution Examples Region.
Personally, we prefer to use PowerShell ISE for our testing since we develop the code in PowerShell ISE environment.
Here is the script that we will test:
function Get-MDOSInfo {
    param(
        [Parameter( ValueFromPipeline=$true,
                    ValueFromPipelineByPropertyName=$true)]
        [string[]]$computername = 'localhost'
    )
    BEGIN {}
    PROCESS {

        foreach ($name in $computername){
            $params = @{ 'ComputerName'=$name;
                        'Class'='CIM_OperatingSystem';
                        'ErrorAction'='Stop'}

            $os = Get-CimInstance @params

            $properties = @{'Computer Name'=$name;
                            'OS Name'=$os.Caption;
                            'OS Version'=$os.Version;
                            '64 or 32 bits'=$os.OSArchitecture
                            }

            $obj = New-Object -TypeName PSObject -Property $properties

            Write-Output $obj
        }
    }
    END{}
}
Our first test function call can be quite easy and we can just provide the name of function. With this test we are testing default value (localhost) of input parameter.
Get-MDOSInfo
Our next test can check input parameter type and wheatear accepts array of values as input.
Get-MDOSInfo -computername 'localhost', 'localhost'We are sending two computer names so we expect two lines in output.

Our next test is finally testing if this is Pipeline Function or not. We send string value localhost into the PowerShell Pipeline and our function should use Pipeline By Value method since we have an input parameter ($computername) that accepts string data type and accepts Pipeline By Value data.
'localhost' | Get-MDOSInfo
Our next test is very similar to the previous test but this time we are sending two string values to test both Pipeline By Value method and the fact that the input parameter is string array data type so it should accept multiple values through PowerShell Pipeline.
'localhost', 'localhost' | Get-MDOSInfo
Our final test will test Pipeline Values By Property Name and array of string. To do this test we have an extra step comparing with the previous test.
We use Select-Object PowerShell CmdLet with an expression in order to change the label of sent date through Pipeline into computername. Pipeline sent data label (computername) is the same as Get-MDOSInfo function input parameter ($computername).
One more important thing is that data sent down the PowerShell Pipeline are string data types and the Get-MDOSInfo function input parameter accepts string data types.
'localhost', 'localhost' | Select-Object @{label="computername";expression={$_}} | Get-MDOSInfo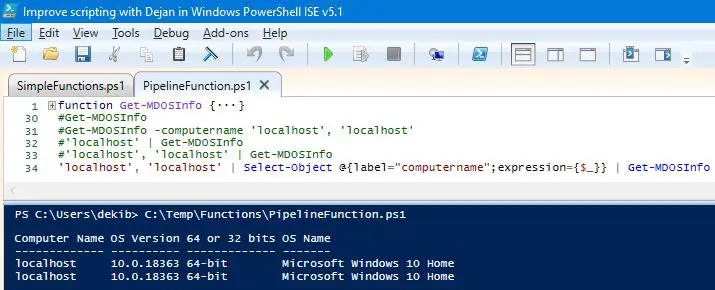
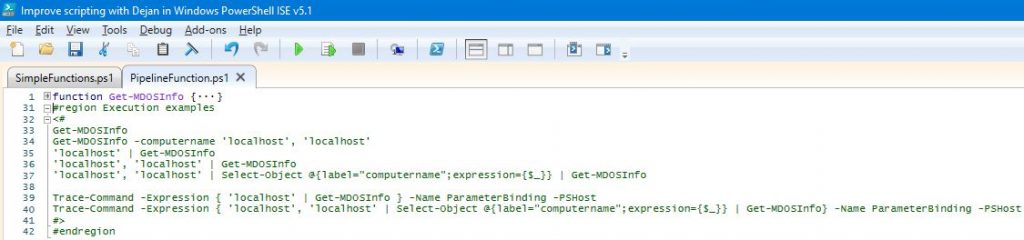
How To Add PowerShell Regions
Now, when we are done with our testing and got satisfying outcomes we can prepare our function for deployment in the production environment and comment out each of the previously tested function calls and for readability reasons group that comment into the Execution Examples PowerShell Region.
Here are the simple steps how to accomplish this:
- Use comment tags <# #> to comment out all the function calls
- Use #region #endregion tags to create the region
- After the #region tag, we provide the name of the PowerShell Region.
Here is the PowerShell function code after implementing the above steps and code changes.
function Get-MDOSInfo {
    param(
        [Parameter( ValueFromPipeline=$true,
                    ValueFromPipelineByPropertyName=$true)]
        [string[]]$computername = 'localhost'
    )
    BEGIN {}
    PROCESS {

        foreach ($name in $computername){
            $params = @{ 'ComputerName'=$name;
                        'Class'='CIM_OperatingSystem';
                        'ErrorAction'='Stop'}

            $os = Get-CimInstance @params

            $properties = @{'Computer Name'=$name;
                            'OS Name'=$os.Caption;
                            'OS Version'=$os.Version;
                            '64 or 32 bits'=$os.OSArchitecture
                            }

            $obj = New-Object -TypeName PSObject -Property $properties

            Write-Output $obj
        }
    }

    END{}
}
#region Execution examples
<#
Get-MDOSInfo
Get-MDOSInfo -computername 'localhost', 'localhost'
'localhost' | Get-MDOSInfo
'localhost', 'localhost' | Get-MDOSInfo
'localhost', 'localhost' | Select-Object @{label="computername";expression={$_}} | Get-MDOSInfo

Trace-Command -Expression { 'localhost' | Get-MDOSInfo } -Name ParameterBinding -PSHost
Trace-Command -Expression { 'localhost', 'localhost' | Select-Object @{label="computername";expression={$_}} | Get-MDOSInfo} -Name ParameterBinding -PSHost
#>
#endregion
Now we can collapse both our function code and region code which can help us to go through the code fast especially if we have lots of functions in the same script.

How To Check Which PowerShell Pipeline Input Has Been Used
We have written our PowerShell Pipeline Function Get-MDOSInfo and defined input parameter $computername to accept PowerShell Pipeline Values both By Value and By Property Name.
Next, we have verified with testing that both PowerShell Pipeline Ways return to us the desired outcome.
Now it is the time to go under the hood of PowerShell Engine and see how it works and decides which PowerShell Pipeline way to use.
As we already know, PowerShell Function input parameters can accept PowerShell Pipeline input in two ways:
- By Value
- By Property Name
If one PowerShell function input parameter accepts both ways (By Value and By Property Name) how we can know which one has been used by the PowerShell Engine.
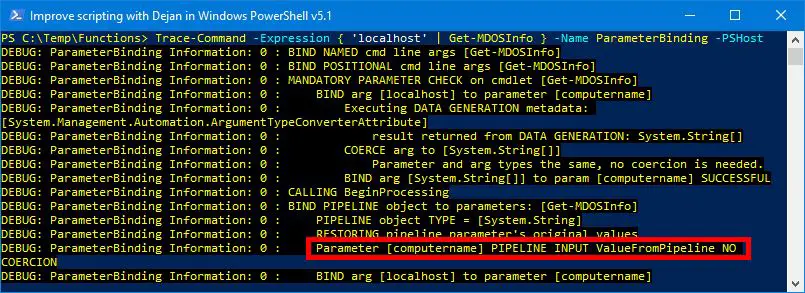
Luckily for us, PowerShell has a native PowerShell CmdLet that can give us that answer. Trace-Command PowerShell CmdLet will help us.
We can use the test code examples from the previous subheading to see how Trace-Command PowerShell CmdLet works.
We had a test of PowerShell Pipeline By Value as such:
'localhost' | Get-MDOSInfoLet’s wrap this test with Trace-Command and verify that PowerShell Pipeline By Value way has been used.
Trace-Command -Expression { 'localhost' | Get-MDOSInfo } -Name ParameterBinding -PSHostHere is the line that confirms the use of PowerShell Pipeline By Value way has been used.
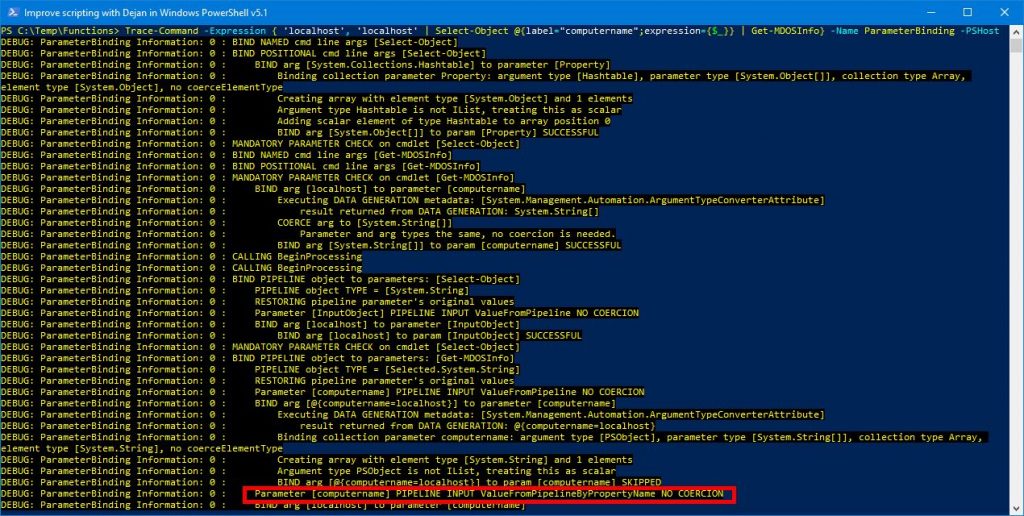
We had a test of PowerShell Pipeline by Property Name as well:
'localhost', 'localhost' | Select-Object @{label="computername";expression={$_}} | Get-MDOSInfoLet’s wrap this test with Trace-Command as well and verify that PowerShell Pipeline By Property Name has been used.
Trace-Command -Expression { 'localhost', 'localhost' | Select-Object @{label="computername";expression={$_}} | Get-MDOSInfo} -Name ParameterBinding -PSHostHere is the line that confirms the use of the PowerShell Pipeline By Property Name way has been used.
Although this article is not about the PowerShell Pipeline feature which is extremely important and essential to comprehend how PowerShell works we have written a dedicated PowerShell Pipeline article that goes in-depth about the subject so please read “PowerShell Pipeline Concept Explained With Awesome Examples“.
What Is The Difference Between PowerShell Function And Advanced PowerShell Function
The difference between the regular PowerShell Function And Advanced PowerShell Function is that Advanced PowerShell Function has a number of common parameters (Verbose, Debug, Confirm, WhatIf, etc.) that are automatically added to the function.
We have written a dedicated article that explains how to convert PowerShell Function into Advanced PowerShell function so please read “Easy Steps For Writing PowerShell Advanced Functions“.

Here we compare some PowerShell functions features and which are specific for Advanced PowerShell Functions.
| Feature | Function | Advanced Function |
|---|---|---|
| CmdletBinding | No | Yes |
| Common Parameters (Verbose, Debug, Confirm, WhatIf, etc.) | No | Yes |
| param() | Yes, optional | Must implement but can be empty. |
| Input Parameters | Yes, optional | Yes, optional |
| PowerShell Pipeline (Begin, Process, End) | Yes, optional | Yes, optional |
| Error handling | Yes, optional | Yes, optional |
| Comment-Based Help | Yes, optional | Yes, optional |
REMEMBER: Our ultimate goal is to be capable to write our own PowerShell CmdLets that will have the same look and feel as native PowerShell CmdLet.
When we learn to write our own PowerShell Functions we have accomplished a big portion of our ultimate goal and write our own PowerShell CmdLet that will have the same look and feel as native PowerShell CmdLets.
To convert the PowerShell function into Advanced PowerShell Function demands just a few simple steps. That is the subject of our next article and Part 2 of the PowerShell Functions Series.
Finally, from the Advanced PowerShell function, we need a few more steps to convert into PowerShell CmdLet. That is Part 3 of the PowerShell Functions Series.
You are on the right track to become a savvy PowerShell code scripter so please continue reading through Advance PowerShell Function and PowerShell CmdLets articles.
PowerShell Functions And PowerShell Profiles
Our Goal is to be able to load our PowerShell Functions written in our PowerShell Scripts each time we open either PowerShell Console or Windows PowerShell ISE. This text will provide you the steps to achieve exactly that but let’s discuss a few things first.
We have already learned how the PowerShell Function can be loaded (using dot source method) in our environment (PowerShell Console for example) first and then called and reused as needed.
But the biggest problem with that approach is that as soon as we close PowerShell Console our session has been closed and our functions are not loaded anymore so next time when open again PowerShell Console we need to implement dot sourcing method again.
You will agree that this is a tedious and boring job that no one likes to do, so can we do any better. Well, we can automate this using PowerShell Profiles.
So every time we open either PowerShell Console or Window PowerShell ISE, PowerShell Engine will look for PowerShell Profiles which are nothing but PowerShell Scripts with specific names and saved in specific locations.
PowerShell Engine will execute the code that is within these PowerShell Profile script and our environment and session will be with preloaded functions or some other features that we want to have when we start our work with PowerShell.
To achieve our goal we want to create a PowerShell Profile that will load our PowerShell Scripts with our PowerShell Functions.
IMPORTANT: We will create and configure PowerShell Profile file for the current user and all the hosts (PowerShell Console and ISE) for the PowerShell Version 5.1
If you want to learn about creating and configuring other PowerShell Profiles please read the article where we have explained that to the smallest details. “How To Create PowerShell Profile Step by Step with Examples“
Here are the steps to follow to create and configure the PowerShell Profile file:
- Open the Windows PowerShell Console.
- Test if the Profile file already exists running the following line of code.
Test-Path $PROFILE.CurrentUserAllHosts
- If the result of the Profile File existence test is false, that means the profile file doesn’t exist so we can create it running the following command.
New-Item -Type File -Force $PROFILE.CurrentUserAllHosts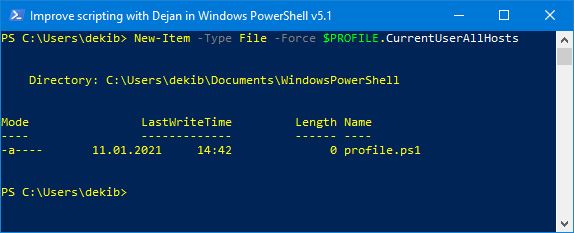
- If the result of the Profile File existence test is true, that means the profile file exists and we can open it in PowerShell ISE to configure the file.
- If we have just created the Profile file we can also open the file running the following line of code:
ise $PROFILE.CurrentUserAllHosts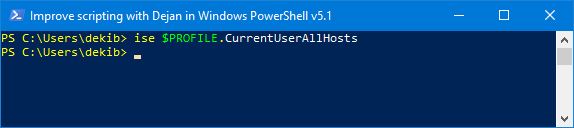
- Now the Profile File has been opened in PowerShell ISE so we can do the changes and save our configuration.
- Add the following lines of code that will implement the well-known dot source method of running the scripts.
NOTICE: We have provided the absolute path to the location where our PowerShell script files have been saved.
. "C:\Temp\Functions\SimpleFunctions.ps1"
. "C:\Temp\Functions\PipelineFunction.ps1"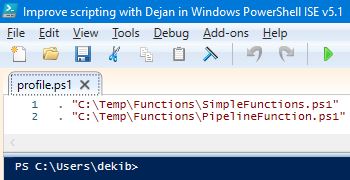
- Open the new PowerShell Console and test if the functions have been loaded after we have configured the Profile file.
dir function: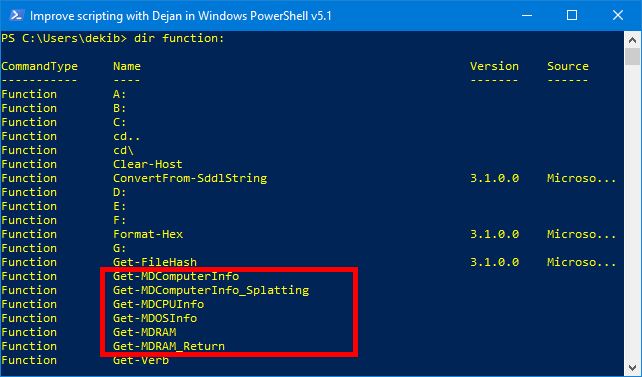
- Open the new PowerShell ISE environment and run the same command to check loaded functions.
So we have achieved our goal and no need to load the functions every time we open a new PowerShell session.
I have to emphasize that this is not the best approach and we have written two articles that explain how to write own PowerShell CmdLets and how to create and configure PowerShell Profile files.
Especially I would like to point to you on the topic “How We Link Together PowerShell Profile, Module, And CmdLet” where we have explained how to organize your code in PowerShell CmdLets, Modules, Profiles and achieve that your PowerShell Functions look and feel as native PowerShell CmdLets.
PowerShell Scripts for FREE
We have written many own PowerShell CmdLets and called them Efficiency Booster PowerShell Project.
There are thousands and thousands of code lines in them and we are sure that you can learn a lot so we are strongly encouraging you to download the source code and deploy the code on your own test environment before maybe implementing them in production.
These CmdLets provide many useful pieces of information about the system we are working on and just to name a few:
- Free Disk Space
- Windows Event Logs Errors
- CPU Properties
- Last Boot Up Time
- Printer Information
- Memory Properties
- Operating System Information
- Network Cards Information
- Handling Windows Services
- Ping Servers
- Computer System Information
- Folder Sizes
- Zip and Unzip
- Send Emails
- Save To Excel Files
- Error Logging
- etc.
Source code can be downloaded from this zip file
Enjoy and have fun but remember PowerShell Every Day 🙂